Mini Egg Cheesecake Cookie Bars Recipe
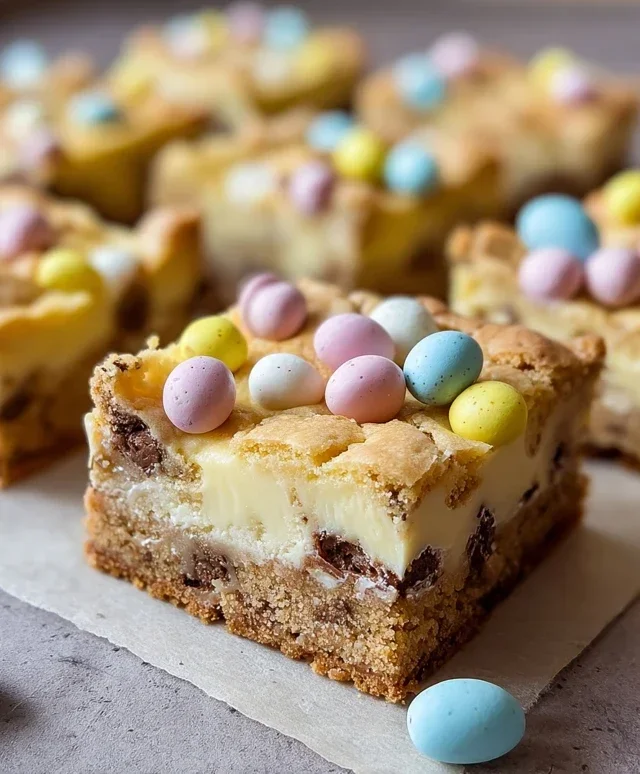
Mini Egg Cheesecake Cookie Bars are the ultimate springtime indulgence, a treat that I’ve been dreaming up ever since those delightful little speckled eggs started appearing on shelves. If you’re anything like me, the sight of Mini Eggs instantly sparks joy and a craving for something truly special. These aren’t just any cookie bars; they’re a harmonious fusion of two beloved desserts. Imagin extracte a buttery, chewy cookie base, rich and decadent, giving way to a creamy, tangy cheesecake layer, all studded generously with those iconic crunchy Mini Eggs. What makes these Mini Egg Cheesecake Cookie Bars so irresistible is the perfect textural contrast and the explosion of familiar, festive flavor. They’re incredibly satisfying without being overly complicated to make, making them a showstopper for Easter gatherings or just a delightful weekend baking project for yourself.
Mini Egg Cheesecake Cookie Bars
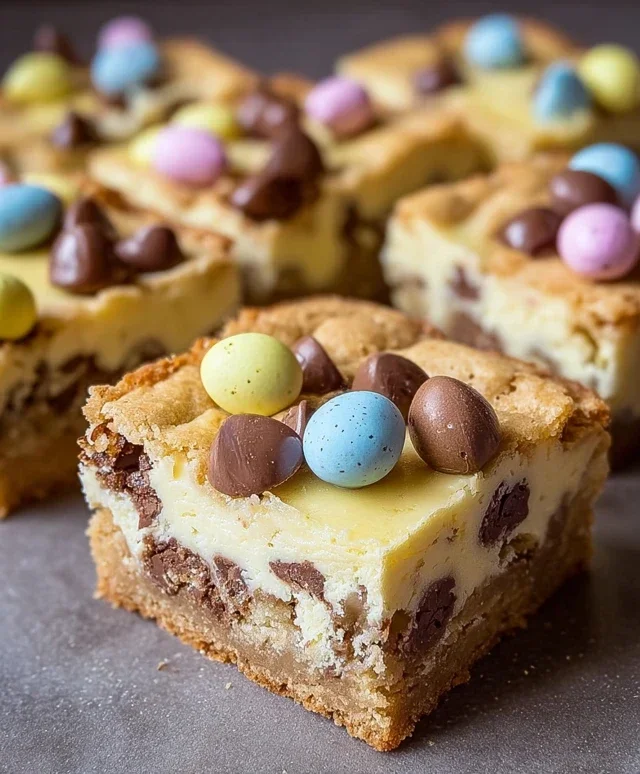
Get ready to elevate your dessert game with these absolutely divine Mini Egg Cheesecake Cookie Bars! Imagin extracte a chewy, soft-baked cookie base, swirled with a rich, creamy cheesecake layer, and studded with the delightful crunch and pastel colours of Cadbury Mini Eggs and melt-in-your-mouth chocolate chips. These bars are a perfect symphony of textures and flavours, making them an instant crowd-pleaser for any occasion, from Easter celebrations to just a Tuesday treat. They’re surprisingly easy to make, and the combination of gooey cookie, tangy cheesecake, and chocolatey goodness is simply irresistible. So, grab your apron and let’s get baking!
Ingredients:
Cookie Base Preparation
The foundation of these spectacular bars is a wonderfully chewy cookie dough. We’re going to start by creaming together the wet ingredients to ensure a smooth and luscious texture.
Step 1: Combine Wet Ingredients for Cookie Dough
In a large mixing bowl, whisk together the melted butter, light brown sugar, and ½ cup of regular sugar until well combined and smooth. The brown sugar adds a wonderful moisture and caramel-like depth of flavour that’s essential for a chewy cookie. Next, add the two large eggs, one at a time, beating well after each addition to fully incorporate them. Stir in the 1 ½ teaspoons of vanilla extract. This vanilla will add a lovely aromatic sweetness that complements all the other flavours.
Step 2: Incorporate Dry Ingredients
In a separate medium bowl, whisk together the flour, baking soda, baking powder, and salt. This ensures that the leavening agents are evenly distributed, preventing pockets of baking soda or powder in your cookie bars. Gradually add the dry ingredients to the wet ingredients, mixing on low speed or by hand until just combined. Be careful not to overmix at this stage, as overmixing can lead to tough cookies. A few streaks of flour are perfectly fine.
Step 3: Add Mix-ins to Cookie Dough
Now for the fun part! Gently fold in the roughly chopped Cadbury mini eggs and the chocolate chips. I like to reserve a few whole mini eggs to press on top before baking for an extra decorative touch and a burst of colour. Make sure the mini eggs are roughly chopped rather than finely minced; you want distinct pieces of the chocolate shell and the white chocolate interior to shine through.
Cheesecake Layer Preparation
While the cookie dough chills slightly, we’ll prepare the creamy, tangy cheesecake swirl. This layer adds a luxurious contrast to the sweet cookie.
Step 4: Prepare the Cheesecake Mixture
In a medium bowl, beat the softened cream cheese with the ⅓ cup of sugar until it’s completely smooth and lump-free. It’s crucial that the cream cheese is truly softened; this will make it much easier to achieve a silky texture without any lumps. Next, beat in the remaining large egg and the 1 teaspoon of vanilla extract until just combined. Again, avoid overmixing.
Assembling and Baking the Bars
Now it’s time to bring all these delicious components together and bake them into golden perfection.
Step 5: Assemble and Bake the Bars
Preheat your oven to 350°F (175°C). Line a 9×13 inch baking pan with parchment paper, leaving an overhang on the sides. This will make it incredibly easy to lift the bars out of the pan once they’ve cooled. Press about two-thirds of the cookie dough evenly into the bottom of the prepared baking pan. Don’t worry if it’s not perfectly uniform; it will spread as it bakes. Dollop spoonfuls of the cheesecake mixture over the cookie dough. Then, using a knife or a skewer, gently swirl the cheesecake mixture into the cookie dough. Be creative with your swirling – you want ribbons of cheesecake throughout the cookie base. If you reserved any whole mini eggs, now is the time to gently press them into the top of the bars.
Bake for 30-40 minutes, or until the edges are golden brown and set, and the cheesecake filling is mostly set but still slightly jiggly in the center. A toothpick inserted into the cookie part should come out with moist crum extractbs attached, and into the cheesecake should come out mostly clean.
Allow the bars to cool completely in the pan on a wire rack before cutting. This is a crucial step for the cheesecake layer to fully set. For cleaner cuts, you can refrigerate the bars for about 30 minutes to an hour after they’ve cooled to room temperature. Once cooled, lift the bars out of the pan using the parchment paper overhang. Cut into squares or rectangles, and prepare for a taste of pure bliss! Enjoy these delightful Mini Egg Cheesecake Cookie Bars!
Conclusion:
And there you have it – your ultimate guide to crafting delicious Mini Egg Cheesecake Cookie Bars! These bars are an absolute triumph of textures and flavors, combining the rich, creamy tang of cheesecake with the comforting chew of a classic cookie, all studded with those delightful crunchy Mini Eggs. They’re perfect for any occasion, from a festive Easter treat to a simple afternoon indulgence. I truly believe these are a must-try for any dessert lover. They are incredibly satisfying, visually appealing, and surprisingly easy to make, meaning you can impress your friends and family with minimal fuss.
For serving suggestions, I love enjoying these bars chilled, which really lets the cheesecake set beautifully. They pair wonderfully with a cup of coffee or a glass of cold milk. Don’t be afraid to get creative with variations! You could swap the Mini Eggs for other chopped chocolate candies, or even add a swirl of raspberry jam into the cheesecake layer for a fruity twist. I wholeheartedly encourage you to give these Mini Egg Cheesecake Cookie Bars a go. I’m confident you’ll fall in love with them just as much as I have!
Frequently Asked Questions:
Can I make these bars ahead of time?
Absolutely! These bars are fantastic for making ahead. In fact, I often find they taste even better after sitting in the refrigerator for a few hours, allowing the flavors to meld and the cheesecake to firm up. Store them in an airtight container in the fridge for up to 3-4 days.
What if I can’t find Mini Eggs?
No worries at all! If Mini Eggs are out of season or unavailable, you have plenty of other delicious options. Consider using chopped Cadbury Creme Eggs, chopped chocolate chips (milk, dark, or white), or even chopped M&Ms for a similar colorful crunch. Get creative and see what you have on hand!
Can I freeze these bars?
Yes, you can! I recommend cutting the bars before freezing them. Wrap individual bars tightly in plastic wrap, then place them in a freezer-safe container or bag. They should last for about 1-2 months. Thaw them in the refrigerator overnight for the best texture.
Mini Egg Cheesecake Cookie Bars
Decadent cookie bars swirled with creamy cheesecake and studded with colorful Cadbury Mini Eggs.
Ingredients
-
1 cup butter, melted
-
¾ cup light brown sugar
-
½ cup sugar
-
2 large eggs
-
1 ½ tsp vanilla extract
-
2 ¼ cups flour
-
1 tsp baking soda
-
½ tsp baking powder
-
½ tsp salt
-
1 ½ cups Cadbury mini eggs
-
1 cup chocolate chips
-
1 (8 oz.) block of cream cheese, softened
-
⅓ cup sugar
-
1 large egg
-
1 tsp vanilla extract
Instructions
-
Step 1
Preheat oven to 350°F (175°C). Line a 9×13 inch baking pan with parchment paper, leaving an overhang on the sides. -
Step 2
In a large bowl, combine melted butter, light brown sugar, and ½ cup sugar. Beat until well combined. -
Step 3
Beat in 2 large eggs one at a time, then stir in 1 ½ tsp vanilla extract. -
Step 4
In a separate bowl, whisk together flour, baking soda, baking powder, and salt. Gradually add dry ingredients to wet ingredients, mixing until just combined. -
Step 5
Fold in 1 ½ cups Cadbury mini eggs and 1 cup chocolate chips. Press about two-thirds of the cookie dough evenly into the bottom of the prepared baking pan. -
Step 6
In a medium bowl, beat softened cream cheese with ⅓ cup sugar until smooth. Beat in 1 large egg and 1 tsp vanilla extract until combined. -
Step 7
Dollop the cream cheese mixture over the cookie dough in the pan. Crumble the remaining cookie dough over the cream cheese layer. You can also swirl the cream cheese into the cookie dough slightly. -
Step 8
Bake for 30-35 minutes, or until the edges are golden brown and the center is set. -
Step 9
Let cool completely in the pan on a wire rack before cutting into bars. Chill for at least 30 minutes before serving for cleaner cuts.
Important Information
Nutrition Facts (Per Serving)
It is important to consider this information as approximate and not to use it as definitive health advice.
Allergy Information
Please check ingredients for potential allergens and consult a health professional if in doubt.