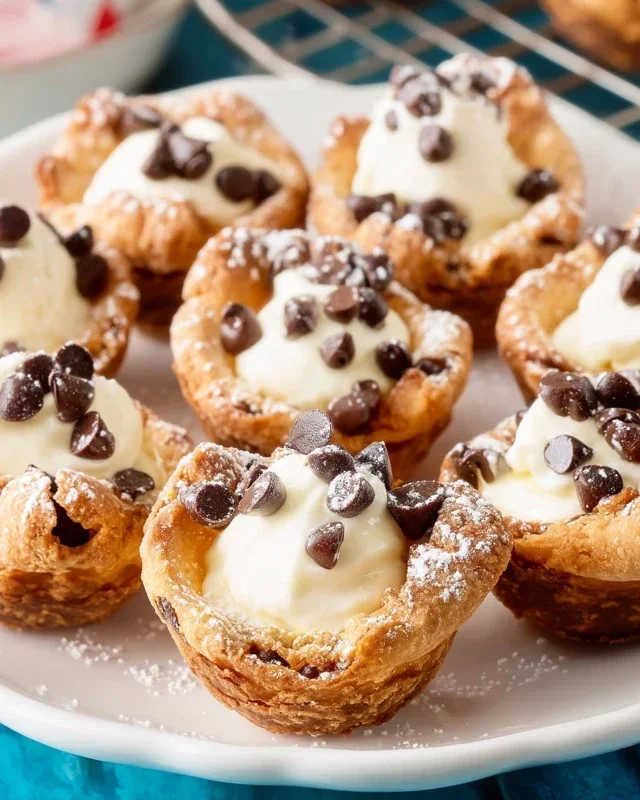
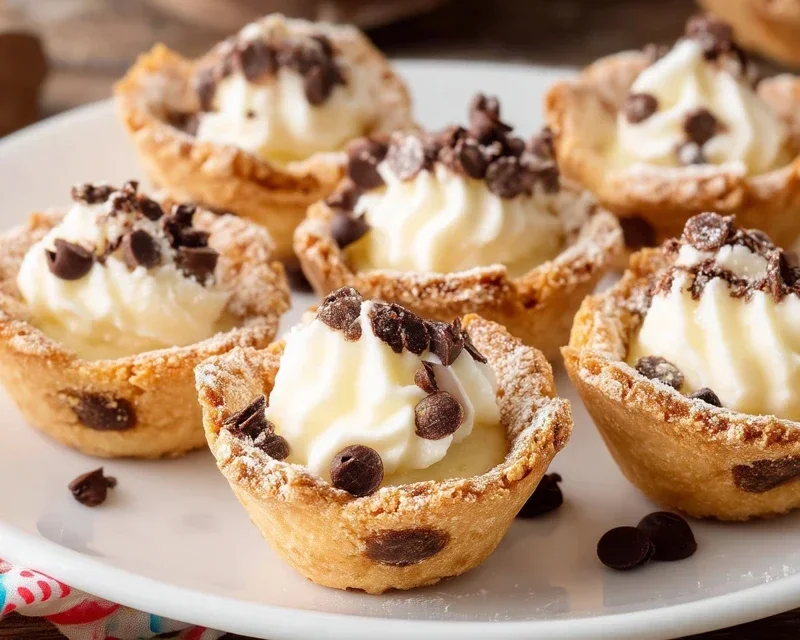
Mini Cannoli Cups- Irresistible Italian Dessert Recipe
Mini cannoli cups are an absolute delight, a miniature masterpiece that captures all the charm and flavor of their larger Sicilian cousins without any of the fuss. Have you ever found yourself craving that iconic crisp shell filled with creamy, sweet ricotta, but felt intimidated by the rolling and frying process? Well, I have the perfect solution for you! These mini cannoli cups are incredibly approachable, making them ideal for both seasoned bakers and those just dipping their toes into the wonderful world of Italian pastries. What makes them so special is their delightful bite-sized nature, perfect for parties, dessert buffets, or simply indulgin extractg your sweet tooth without overdoing it. We’re talking about that irresistible crunch giving way to a luscious, subtly sweet filling, often enhanced with a hint of citrus or chocolate chips. Get ready to impress yourself and your loved ones with these charming mini cannoli cups!
Why You’ll Love These Mini Cannoli Cups:
Effortless Elegance
They deliver all the iconic cannoli flavor in a convenient, no-fry format.
Party Perfect
Their small size makes them ideal for sharing and a beautiful addition to any gathering.
Customizable Fun
Easily adapt the filling and toppings to suit your personal taste.
Mini Cannoli Cups
Are you dreaming of the delightful crunch and creamy filling of cannoli but intimidated by the thought of rolling and frying dough? Well, I have fantastic news! Today, we’re making incredibly easy and utterly delicious Mini Cannoli Cups. These little wonders capture all the classic flavors of authentic cannoli without any of the fuss. They’re perfect for parties, a sweet afternoon treat, or whenever that craving strikes. We’ll be using a shortcut that’s a game-changer, transforming readily available pie crusts into perfect little cups that bake up golden and crispy, ready to be filled with a luscious, sweet ricotta cream. Get ready to impress yourself and your loved ones with these delightful, bite-sized Italian pastries!
Ingredients:
Instructions:
Step 1: Prepare the Creamy Ricotta Filling
The heart of any cannoli is its rich, creamy filling. We’ll start by getting that ready. First, and this is an important step for the best texture, make sure your ricotta cheese is well-drained. You can do this by placing it in a fine-mesh sieve lined with cheesecloth (or a clean kitchen towel) set over a bowl. Let it sit in the refrigerator for at least an hour, or even overnight if you have the time. This removes excess liquid, preventing a watery filling. Once drained, transfer the ricotta to a medium bowl. Add the powdered sugar and granulated sugar to the bowl. Using a whisk or an electric mixer on low speed, blend the ingredients until smooth and well combined. Next, gently fold in the finely grated orange or lemon zest. The zest adds a wonderfully bright, fragrant aroma and a subtle citrus note that cuts through the sweetness beautifully. Finally, stir in the vanilla extract. Taste the filling and adjust sweetness if necessary, though this combination is usually just right. Cover the bowl tightly with plastic wrap and refrigerate while you prepare the crusts. This allows the flavors to meld and the filling to firm up slightly.
Step 2: Create the Crispy Cups
Now for the clever shortcut! We’re going to use refrigerated pie crusts to create our cannoli cups. Open your box of pie crusts and let them soften according to the package directions. This usually takes about 15-20 minutes at room temperature, making them pliable and easy to work with. Once softened, unroll both pie crusts. For this recipe, we’re going to cut them into smaller rounds that will fit into our muffin tin. I find that using a cookie cutter, or even a small round glass or ramekin with a diameter of about 3-4 inches, works perfectly. You want pieces that are large enough to line the bottom and sides of your muffin cups. You should be able to get about 6-8 rounds from each pie crust, giving you a total of 12-16 cups. Gently press each dough round into the bottom and up the sides of a lightly greased or parchment-lined mini muffin tin. Make sure the dough is pressed firmly into all the crevices to create a good cup shape. It’s okay if the edges extend a little beyond the muffin tin; we’ll trim those later.
Step 3: Bake the Cups to Golden Perfection
Preheat your oven to 375°F (190°C). Once your muffin tin is filled with the prepared dough cups, it’s time to bake them. To help them hold their shape and bake evenly, you can prick the bottoms of each cup a few times with a fork. This prevents the dough from puffing up too much in the center. Now, place the muffin tin in the preheated oven. Bake for approximately 12-15 minutes, or until the edges of the pie crust are lightly golden brown and the bottoms look cooked through. Keep a close eye on them as ovens can vary. The goal is a crisp, sturdy cup that will hold our filling.
Step 4: Add the Crunchy Topping and Finish the Cups
While the cups are still warm and directly after you remove them from the oven, it’s the perfect time to add that delightful crunchy topping. In a small bowl, combine the turbinado sugar and ground cinnamon. This mixture will create a wonderfully spiced, slightly crunchy coating for the rim of our cannoli cups. As soon as you take the muffin tin out of the oven, carefully invert the warm cannoli cups onto a wire rack. If you used a standard muffin tin, you might need to gently loosen the edges with a knife before inverting. While the cups are still warm, lightly brush the top edges with a little bit of water or melted butter (optional, but helps the sugar stick better) and then dip them into the turbinado sugar and cinnamon mixture, or sprinkle it over the edges. This gives them that signature cannoli look and flavor. You can also use this mixture to lightly sprinkle over the entire outside of the cups if you prefer. Let the cups cool completely on the wire rack. This is crucial; if you try to fill them while they are still warm, the filling will melt and become messy.
Step 5: Fill and Decorate Your Mini Masterpieces
Once your cannoli cups are completely cool, it’s time for the grand finnon-alcoholic ale! Spoon the chilled ricotta filling into a piping bag fitted with a star tip, or a Ziploc bag with the corner snipped off. This makes for a neater and more attractive presentation, but you can also simply spoon the filling into the cups if you don’t have a piping bag. Pipe or spoon the filling generously into each cooled cannoli cup. For an extra touch of indulgence and visual appeal, you can then dip the ends of the filled cannoli cups into miniature semisweet chocolate chips or finely chopped pistachios. Finally, dust the tops with a little extra powdered sugar for that classic, elegant finish. Your Mini Cannoli Cups are now ready to be devoured! They are best enjoyed the same day they are made to ensure maximum crispness of the shell. Enjoy every delicious bite!
Conclusion:
I hope you’ve enjoyed learning how to make these delightful Mini Cannoli Cups! They truly are a showstopper, offering all the classic, irresistible flavors of traditional cannoli in a convenient, bite-sized package. The crisp, golden shells paired with the creamy, sweet ricotta filling, accented with a hint of orange zest and chocolate chips, make these a perfect treat for any occasion. They’re surprisingly simple to assemble, even for begin extractner bakers, and the visual appeal is undeniable.
These mini delights are fantastic served at parties, as a sweet ending to a meal, or simply as an afternoon pick-me-up. Imagin extracte them adorning a dessert table, or individually presented on small plates for an elegant touch. For variations, don’t be afraid to get creative! You could add a splash of liqueur extract to the filling, like Grand Marnier Extract, or stir in finely chopped pistachios for added texture and flavor. Consider dusting them with powdered sugar or drizzling with melted dark chocolate for an extra indulgence. I wholeheartedly encourage you to give this Mini Cannoli Cups recipe a try – I’m confident you’ll love them as much as I do!
Frequently Asked Questions about Mini Cannoli Cups:
Can I make the cannoli shells ahead of time?
Yes, absolutely! You can bake the cannoli shells up to a week in advance and store them in an airtight container at room temperature. Just make sure they are completely cooled before storing to prevent any soggin extractess. It’s best to fill them closer to serving time to maintain their crispness.
What if I don’t have mini cannoli forms?
No problem at all! You can use aluminum foil rolled into tube shapes, or even empty and cleaned metal baking powder cans as substitutes for traditional cannoli forms. Just ensure they are greased well and sturdy enough to hold their shape while frying.
Can I make the filling dairy-free?
While traditional cannoli filling relies on ricotta, you can explore dairy-free alternatives. Coconut cream or cashew-based creams, thickened to a ricotta-like consistency, can be used. Experiment with different options to find your preferred texture and flavor profile.
Mini Cannoli Cups
A simplified, no-fry version of classic cannoli, perfect for a quick and delicious dessert.
Ingredients
-
1 container whole-milk ricotta cheese (15 oz., drained)
-
1/2 cup powdered sugar
-
2 tablespoons granulated sugar
-
1 teaspoon finely grated orange zest
-
1/2 teaspoon vanilla extract
-
1 box refrigerated pie crusts, softened as directed on box (2 count )
-
3 tablespoons turbinado sugar (raw sugar)
-
1 teaspoon ground cinnamon
-
1/4 cup miniature semisweet chocolate chips
-
additional powdered sugar
Instructions
-
Step 1
Preheat oven to 375°F (190°C). Grease and flour a 12-cup muffin tin. -
Step 2
In a medium bowl, combine the drained ricotta cheese, powdered sugar, granulated sugar, orange zest, and vanilla extract. Stir until well combined and smooth. -
Step 3
Unroll the refrigerated pie crusts. Using a round cookie cutter or a glass rim (about 3-4 inches in diameter), cut out 12 circles from the pie crusts. -
Step 4
Gently press each pie crust circle into the greased muffin tin cups, forming a shell. -
Step 5
Bake for 10-12 minutes, or until the crusts are golden brown and lightly puffed. -
Step 6
While the crusts are baking, in a small bowl, mix together the turbinado sugar and ground cinnamon. -
Step 7
Once baked, carefully remove the muffin tin from the oven. Let the crusts cool in the tin for a few minutes before transferring them to a wire rack to cool completely. -
Step 8
Once cooled, fill each cannoli cup with the ricotta mixture. Sprinkle the tops with the cinnamon-sugar mixture and the miniature chocolate chips. -
Step 9
Dust with additional powdered sugar before serving, if desired.
Important Information
Nutrition Facts (Per Serving)
It is important to consider this information as approximate and not to use it as definitive health advice.
Allergy Information
Please check ingredients for potential allergens and consult a health professional if in doubt.