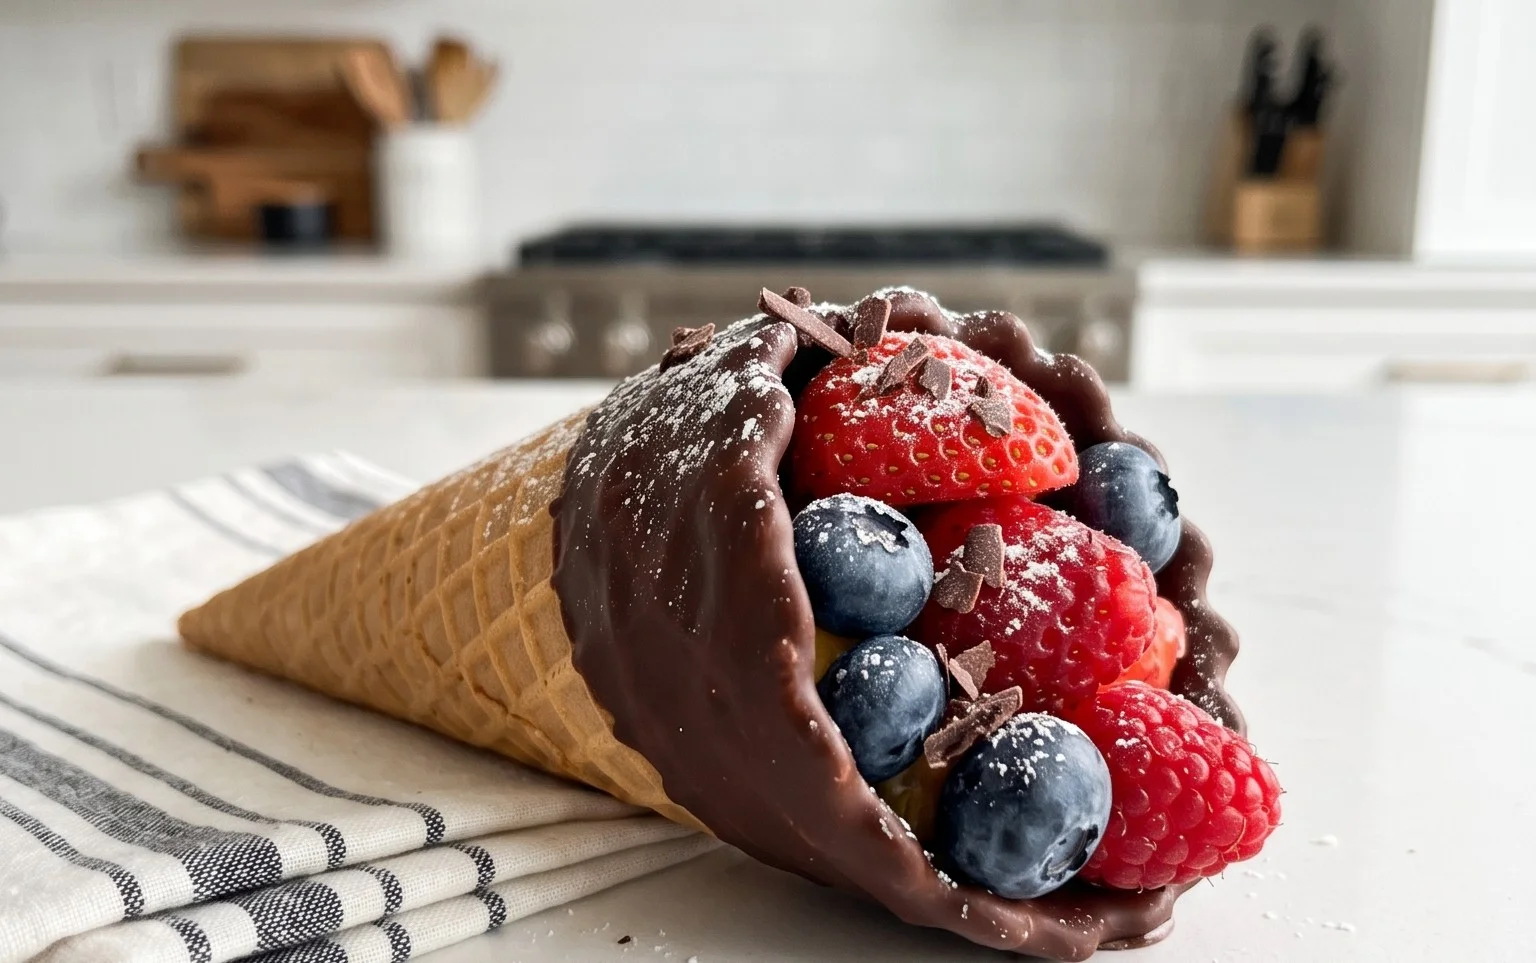
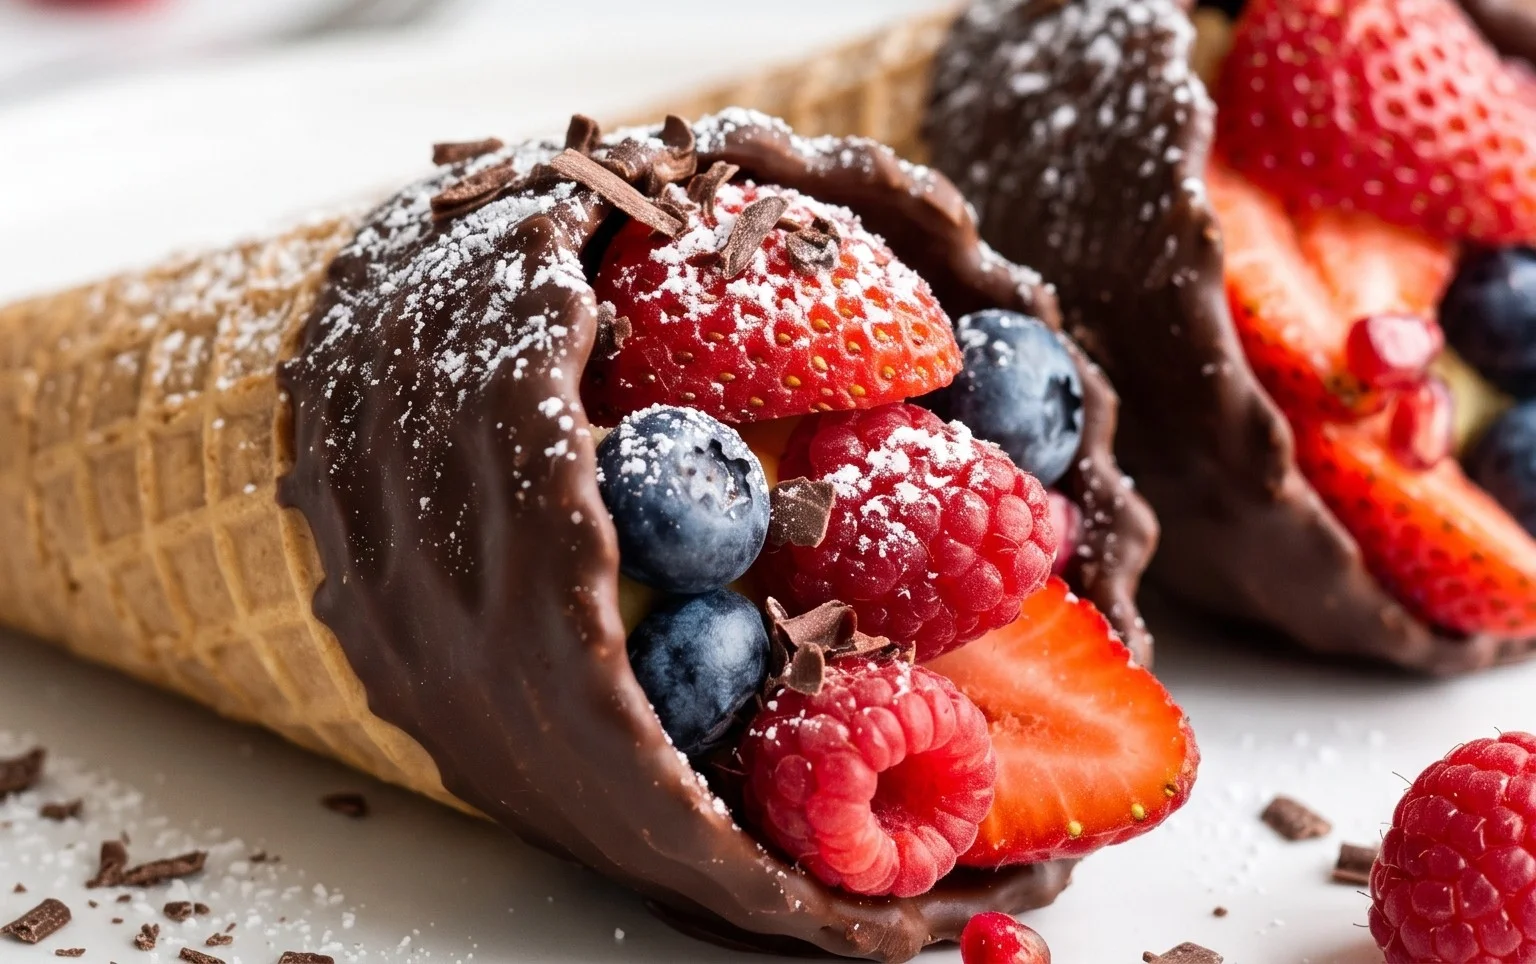
Chocolate Dipped Fruit Cones-Easy Dessert Delight
Chocolate Dipped Fruit Filled Cones are the ultimate indulgence, a delightful fusion of creamy, fruity goodness encased in a crisp, sweet shell. We all crave those moments of pure bliss, and these little treasures deliver just that. Imagin extracte the satisfying crunch of a waffle cone giving way to a luscious filling of fresh, vibrant fruit, all then elegantly swathed in a glossy coat of rich chocolate. What makes chocolate dipped fruit filled cones so special? It’s the perfect textural contrast, the burst of natural sweetness from the fruit, and the decadent embrace of chocolate, creating a truly unforgettable treat that’s both elegant and incredibly fun to eat. They’re perfect for parties, a special dessert, or just a delightful way to brighten your day.
Why You’ll Love These Chocolate Dipped Fruit Filled Cones:
A Symphony of Flavors and Textures
Effortlessly Elegant, Surprisingly Simple
Customizable for Every Craving
Chocolate Dipped Fruit Filled Cones
There’s something truly magical about a perfectly crafted treat that balances the satisfying crunch of a cone with the creamy sweetness of chocolate and the burst of fresh fruit. Today, we’re diving into the delightful world of Chocolate Dipped Fruit Filled Cones. These aren’t just desserts; they’re little edible masterpieces that are surprisingly easy to make and absolutely crowd-pleasing. Imagin extracte biting into a crisp waffle cone, the rich chocolate shell giving way to a burst of vibrant, juicy fruit, all nestled in a creamy filling. It’s a symphony of textures and flavors that will have everyone asking for the recipe.
These cones are perfect for parties, a special dessert after a family dinner, or even just a fun weekend baking project. The beauty of this recipe lies in its versatility. You can customize the fruit filling to your heart’s content, and the type of chocolate used for dipping can be adjusted to suit your preference. So, let’s gather our ingredients and get ready to create some edible joy!
Ingredients:
Preparing the Fruit Filling
First things first, let’s get our fruity component ready. The key here is to have small, manageable pieces of fruit. This ensures that each bite of your cone is packed with flavor without being overwhelming. If you’re using larger fruits like strawberries or kiwi, dice them into roughly 1/4-inch cubes. If you’re using smaller fruits like blueberries or raspberries, they can be left whole or gently halved if they are particularly large.
For fruits that tend to release a lot of moisture, like strawberries or mangoes, you might consider gently patting them dry with a paper towel after dicing. This helps prevent the filling from becoming too watery. We want a fresh, vibrant fruit salad that complements, rather than dilutes, the other flavors. Think of this as your sweet and tangy counterpoint to the rich chocolate and creamy filling.
Whipping Up the Creamy Filling
Now, for the luscious, creamy base that holds our fruit together. In a chilled bowl, combine the heavy whipping cream, powdered sugar, and vanilla extract. Using a hand mixer or a stand mixer fitted with the whisk attachment, whip the cream until stiff peaks form. This means that when you lift the whisk, the cream should hold its shape and form pointed peaks that don’t flop over.
Don’t over-whip the cream, as it can turn grainy and eventually into butter. It’s better to stop just as stiff peaks form. The powdered sugar not only adds sweetness but also helps to stabilize the whipped cream, making it less likely to collapse. The vanilla extract is crucial for adding that classic, comforting flavor note. Once whipped, gently fold in your prepared diced fruit. Be careful not to overmix, as you want to keep the airiness of the whipped cream and avoid crushing the delicate fruit.
Melting the Chocolate for Dipping
This is where the magic truly happens! We need smooth, luscious chocolate for coating our cones. Place the semi-sweet chocolate chips in a microwave-safe bowl. If you’re using coconut oil or vegetable shortening, add it now. The oil or shortening helps the chocolate melt more smoothly and creates a thinner coating that’s less prone to cracking.
Microwave the chocolate in 30-second intervals, stirring well after each interval. It’s important to stir thoroughly because even if the chips still look partially solid, the heat retained in the melted chocolate will continue to melt the rest. Be patient; rushing this step can lead to burnt chocolate. Alternatively, you can use a double boiler method: place the chocolate and oil/shortening in a heatproof bowl set over a saucepan of simmering water, stirring constantly until smooth. The goal is a silky, fluid chocolate that’s easy to dip with.
Assembling the Cones
Now, let’s bring everything together. Take a waffle cone and spoon a generous amount of the fruit and cream filling into the bottom of the cone, filling it about halfway or two-thirds of the way full. You want to leave enough space at the top to dip the cone into the chocolate. Ensure the filling is evenly distributed.
Once filled, carefully hold the cone by the rim and dip the top portion into the melted chocolate. You can either dip it all the way to the filling or leave a small rim of cone showing for a different visual effect. Gently swirl the cone to ensure an even coating.
Finishing Touches and Setting
After dipping the cone into the chocolate, lift it out and let any excess chocolate drip back into the bowl. You can also gently scrape the excess chocolate against the rim of the bowl.
Place the dipped cones on a baking sheet lined with parchment paper or wax paper. If you’d like to add extra flair, now is the time to sprinkle them with toppings like chopped nuts, sprinkles, or a drizzle of contrasting chocolate before the coating sets.
Once all your cones are dipped and decorated, place the baking sheet in the refrigerator for about 15-20 minutes, or until the chocolate has completely hardened. This chilling process is crucial for ensuring the chocolate shell is firm and doesn’t melt when you handle the cones. Once set, your beautiful Chocolate Dipped Fruit Filled Cones are ready to be enjoyed! They are best served shortly after the chocolate has set to maintain the crispness of the cone. You can store any leftovers (though I doubt there will be many!) in an airtight container in the refrigerator, but be aware that the cone may soften over time. Enjoy every delicious bite!
Conclusion:
And there you have it! These chocolate dipped fruit filled cones are an absolute triumph, offering a delightful combination of textures and flavors that are sure to impress. The crisp waffle cone provides a satisfying crunch, perfectly complementing the creamy, fruity filling. Dipped in rich chocolate, they transform into an elegant yet incredibly easy-to-make treat that’s perfect for any occasion. Whether you’re looking for a show-stopping dessert for a party, a fun weekend project with the kids, or simply a way to elevate your afternoon snack, this recipe delivers.
I love serving these as individual desserts after a meal, or as part of a larger dessert buffet. They also make wonderful edible gifts! Don’t be afraid to get creative with your fillings. Consider fresh berries, a vibrant fruit compote, or even a dollop of lemon curd for a tangy twist. You can also experiment with different types of chocolate for dipping – milk, dark, or white chocolate all work beautifully. I truly encourage you to give these chocolate dipped fruit filled cones a try; you won’t be disappointed!
Frequently Asked Questions:
Can I make these ahead of time?
Yes, you absolutely can! Once the chocolate has set, store the cones in an airtight container in a cool, dry place. For the freshest fruit filling, it’s best to assemble them within a day or two of serving. If you’re using cooked fillings like compotes, they can be made a few days in advance.
How do I prevent the chocolate from cracking when I dip the cones?
Ensuring your chocolate is properly tempered is key to a smooth, crack-free coating. Alternatively, you can melt your chocolate slowly and gently over a double boiler or in the microwave in short intervals, stirring frequently. Make sure the melted chocolate isn’t too hot when you dip the cones, and let them set on parchment paper until completely firm.
What are some other filling ideas besides fresh fruit?
The possibilities are endless! You could fill them with a rich chocolate mousse, a creamy cheesecake filling, a spiced apple compote, or even a no-bake cookie dough. A swirl of whipped cream topped with a cherry would also be delightful. Get creative and have fun with it!
Chocolate Dipped Fruit Filled Cones
Delightful waffle cones filled with a creamy, fruity mixture and dipped in rich chocolate for a decadent treat.
Ingredients
-
1 cup (2 sticks) butter, softened
-
1/2 cup granulated sugar
-
1/4 cup packed light brown sugar
-
2 large eggs
-
1 teaspoon vanilla extract
-
2 cups all-purpose flour
-
1/2 teaspoon baking soda
-
1/4 teaspoon salt
-
1/2 cup chopped fresh strawberries
-
1/2 cup chopped fresh blueberries
-
1 cup semi-sweet chocolate chips
-
1 tablespoon vegetable oil
Instructions
-
Step 1
Preheat oven to 350 degrees F (175 degrees C). Grease and flour two 9-inch round cake pans. -
Step 2
In a large bowl, cream together the softened butter, granulated sugar, and brown sugar until light and fluffy. -
Step 3
Beat in the eggs one at a time, then stir in the vanilla extract. -
Step 4
In a separate bowl, whisk together the flour, baking soda, and salt. -
Step 5
Gradually add the dry ingredients to the wet ingredients, mixing until just combined. -
Step 6
Gently fold in the chopped strawberries and blueberries. -
Step 7
Divide the batter evenly between the prepared cake pans and spread smooth. -
Step 8
Bake for 25-30 minutes, or until a wooden skewer inserted into the center comes out clean. -
Step 9
Let cakes cool in pans for 10 minutes before inverting onto a wire rack to cool completely. -
Step 10
Once cooled, crumble the cakes into a bowl. Mix in a tablespoon of frosting (not listed in ingredients but implied for filling). Spoon mixture into waffle cones, pressing gently to fill. -
Step 11
In a microwave-safe bowl, melt the semi-sweet chocolate chips with the vegetable oil, stirring until smooth. Dip the filled cones into the melted chocolate, allowing excess to drip off. -
Step 12
Place dipped cones on parchment paper and let the chocolate set completely before serving.
Important Information
Nutrition Facts (Per Serving)
It is important to consider this information as approximate and not to use it as definitive health advice.
Allergy Information
Please check ingredients for potential allergens and consult a health professional if in doubt.