Red White Blue Dirt Cups- Festive Dessert Fun
Red, White and Blue Dirt Cups are a truly delightful and undeniably festive treat that’s perfect for any occasion, but especially for those summer holidays when patriotism is in the air! We all have those nostalgic desserts from childhood, and for so many of us, these whimsical cups are high on that list. They’re incredibly easy to make, making them a go-to for parties, potlucks, or even just a fun afternoon activity with the kids. What’s not to love about the irresistible combination of creamy pudding, crum extractbly cookie ‘dirt,’ and vibrant fruit? They’re a playful twist on a classic, and the addition of red and blue berries transforms them into a show-stopping dessert that’s as delicious as it is beautiful. Get ready to dig into these amazing Red, White and Blue Dirt Cups – you won’t be able to resist their charm and incredible taste!
Red, White and Blue Dirt Cups
Get ready for a dessert that’s as fun to make as it is to eat! These Red, White and Blue Dirt Cups are a patriotic twist on a classic favorite. Perfect for Fourth of July parties, summer picnics, or just a fun family activity, these layered treats are guaranteed to bring smiles. We’re taking the familiar chocolatey “dirt” and giving it a vibrant patriotic makeover, complete with wiggly gummy worms. It’s simple, delicious, and incredibly customizable. Let’s dive into creating this festive dessert!
Ingredients:
Preparing the Pudding Layers
The foundation of our dirt cups is a creamy, delicious pudding. For this recipe, we’re using cheesecake flavored pudding for a slightly tangier, more sophisticated base than traditional chocolate. This adds a lovely contrast to the rich chocolate cookie crum extractbs.
1. Begin extract by preparing your cheesecake pudding according to the package directions, but with a slight modification. In a large mixing bowl, combine the contents of both cheesecake pudding boxes. Gradually whisk in the 4 cups of milk. Continue whisking until the pudding is smooth and starts to thicken. This usually takes about 2-3 minutes. It’s important to whisk vigorously to ensure there are no lumps and to incorporate air, which will give the pudding a lighter texture. Once it’s thickened to your desired consistency, cover the bowl with plastic wrap, making sure the plastic wrap touches the surface of the pudding. This prevents a skin from forming. Refrigerate the pudding for at least 30 minutes, or until it’s fully set and chilled.
2. While the pudding is chilling, let’s get our “dirt” ready. Take all 19 Oreo cookies and place them into a resealable plastic bag. Gently crush them using a rolling pin or the bottom of a heavy glass. You’re aiming for a coarse, crum extractbly texture that resembles soil, with some slightly larger chunks for visual appeal and a satisfying crunch. Avoid turning them into a fine powder; we want that delightful cookie texture. Once crushed, set aside.
Creating the Patriotic Colors
This is where the magic happens and our dirt cups get their festive red, white, and blue look. We’ll be dividing our pudding and coloring it to create distinct layers.
3. Once your cheesecake pudding is well-chilled and set, it’s time to divide and conquer the colors. Remove the pudding from the refrigerator. You’ll want to divide the pudding into three roughly equal portions. You can eyeball this, or if you want to be precise, you can weigh the pudding or use measuring cups. Place each portion into a separate bowl.
4. In the first bowl, add the ¼ teaspoon of red gel food dye. Gel food coloring is fantastic because it provides intense color without adding extra liquid, which could thin out your pudding. Stir the red food dye thoroughly into the pudding until you achieve a vibrant, consistent red color. Make sure to scrape the sides and bottom of the bowl to incorporate all the dye. Set this bowl aside.
5. In the second bowl, add the ¼ teaspoon of blue gel food dye. Just like with the red, mix it in until you have a rich, solid blue hue. Again, ensure all the dye is incorporated for an even color. Set this bowl aside. The third portion of pudding will remain its natural creamy white color, providing the perfect middle layer.
Assembling the Dirt Cups
Now comes the fun part: layering! This is where we assemble our delicious creations. You can use clear glasses, jars, or even small plastic cups to showcase the beautiful layers.
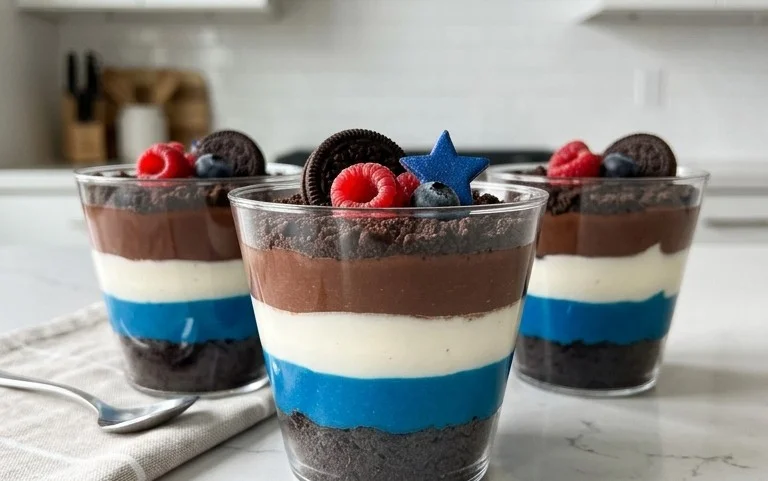
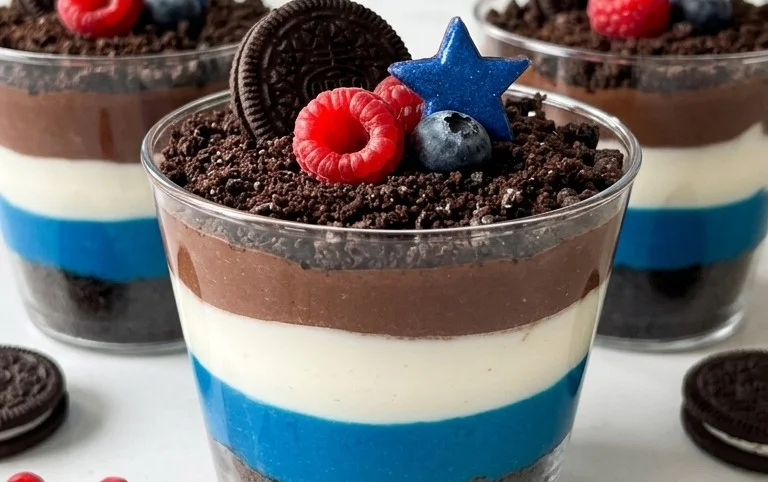
6. Begin extract the assembly by spooning a layer of crushed Oreo cookies into the bottom of each serving cup. This forms the “dirt” base, providing a crunchy foundation. Don’t be shy with the crum extractbs; a good layer will make them look authentic. Next, carefully spoon a layer of the white cheesecake pudding over the cookie crum extractbs. Try to keep the layers as neat as you can. Then, add a layer of the red cheesecake pudding on top of the white layer. Smooth the surface gently with the back of your spoon. After the red layer, add a layer of the blue cheesecake pudding. Finally, top off your dirt cups with another generous layer of crushed Oreo cookie crum extractbs to mimic freshly turned soil. It’s the perfect finishing touch.
7. To complete the look, gently press one red and blue gummy worm into the top layer of cookie crum extractbs in each cup, so they appear to be wriggling out of the dirt. You can position them in various ways for a playful effect. You can even add an extra gummy worm or two sticking out at an angle.
Serve these delightful Red, White and Blue Dirt Cups immediately, or chill them in the refrigerator for another 30 minutes to allow the flavors to meld. They are a wonderfully festive and easy dessert that everyone will adore. Enjoy your sweet, patriotic creation!
Conclusion:
I hope you’ve had as much fun learning about these Red, White and Blue Dirt Cups as I’ve had sharing them! This recipe is an absolute winner for so many reasons. It’s incredibly easy to assemble, making it perfect for last-minute celebrations or a fun activity with kids. The combination of creamy pudding, crunchy cookie crum extractbs, and the festive patriotic colors is a guaranteed crowd-pleaser for any occasion, from Fourth of July barbecues to Memorial Day picnics, or even just a fun summer treat.
These dirt cups are incredibly versatile. They’re fantastic served chilled in individual clear cups or small mason jars for easy portioning. For a larger gathering, you can even layer them in a trifle dish for a stunning centerpiece. Don’t be afraid to get creative with variations! You can swap out the chocolate pudding for vanilla or cheesecake flavor, use gluten-free cookies, or even add a layer of fresh berries between the pudding and cookie crum extractbs for an extra burst of flavor and texture. The possibilities are truly endless, and the joy of creating these delicious treats is immense. I wholeheartedly encourage you to give this Red, White and Blue Dirt Cups recipe a try – you won’t be disappointed!
Frequently Asked Questions:
Can I make these dirt cups ahead of time?
Absolutely! These are a fantastic make-ahead dessert. You can assemble them up to 24 hours in advance. Store them covered in the refrigerator. It’s best to add the gummy worms and any fresh fruit just before serving to keep them looking their best.
What are some other topping ideas besides gummy worms?
There are so many fun options! You could use chocolate chips to resemble pebbles, candy stars for a patriotic touch, sprinkles, whipped cream, fresh blueberries, or even small flag toothpicks. Get creative and have fun decorating!
Red, White and Blue Dirt Cups
A festive and easy no-bake dessert featuring layers of creamy pudding, crushed Oreos, and colorful gummy worms, perfect for patriotic celebrations.
Ingredients
-
2 boxes cheesecake pudding (3.4 ounces each)
-
4 cups milk
-
19 Oreo cookies (crushed)
-
1/4 teaspoon red gel food dye
-
1/4 teaspoon blue gel food dye
-
8 red and blue gummy worms
Instructions
-
Step 1
In a large bowl, whisk together the cheesecake pudding mix and milk for 2 minutes, or until smooth and thickened. Let stand for 5 minutes. -
Step 2
Divide the pudding into three equal portions in separate bowls. -
Step 3
Stir red gel food dye into one portion of pudding until evenly colored. Stir blue gel food dye into another portion. -
Step 4
In clear cups or small jars, layer the ingredients: start with a spoonful of crushed Oreos, followed by a layer of white pudding, then red pudding, then blue pudding. Repeat layers as desired. -
Step 5
Top each cup with more crushed Oreos to resemble dirt. -
Step 6
Garnish each dirt cup with a red and blue gummy worm, sticking out of the ‘dirt’. -
Step 7
Chill for at least 15 minutes before serving.
Important Information
Nutrition Facts (Per Serving)
It is important to consider this information as approximate and not to use it as definitive health advice.
Allergy Information
Please check ingredients for potential allergens and consult a health professional if in doubt.