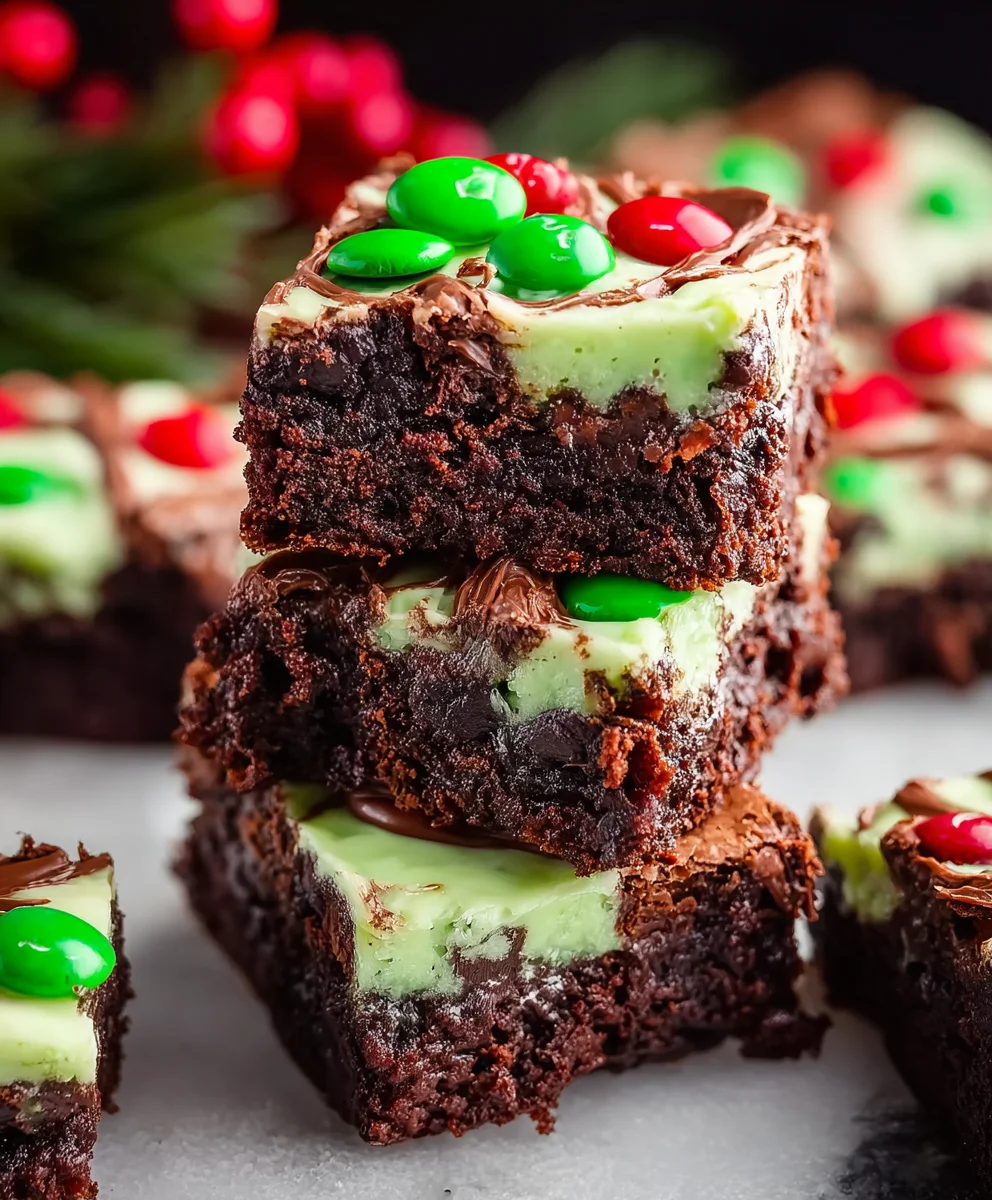
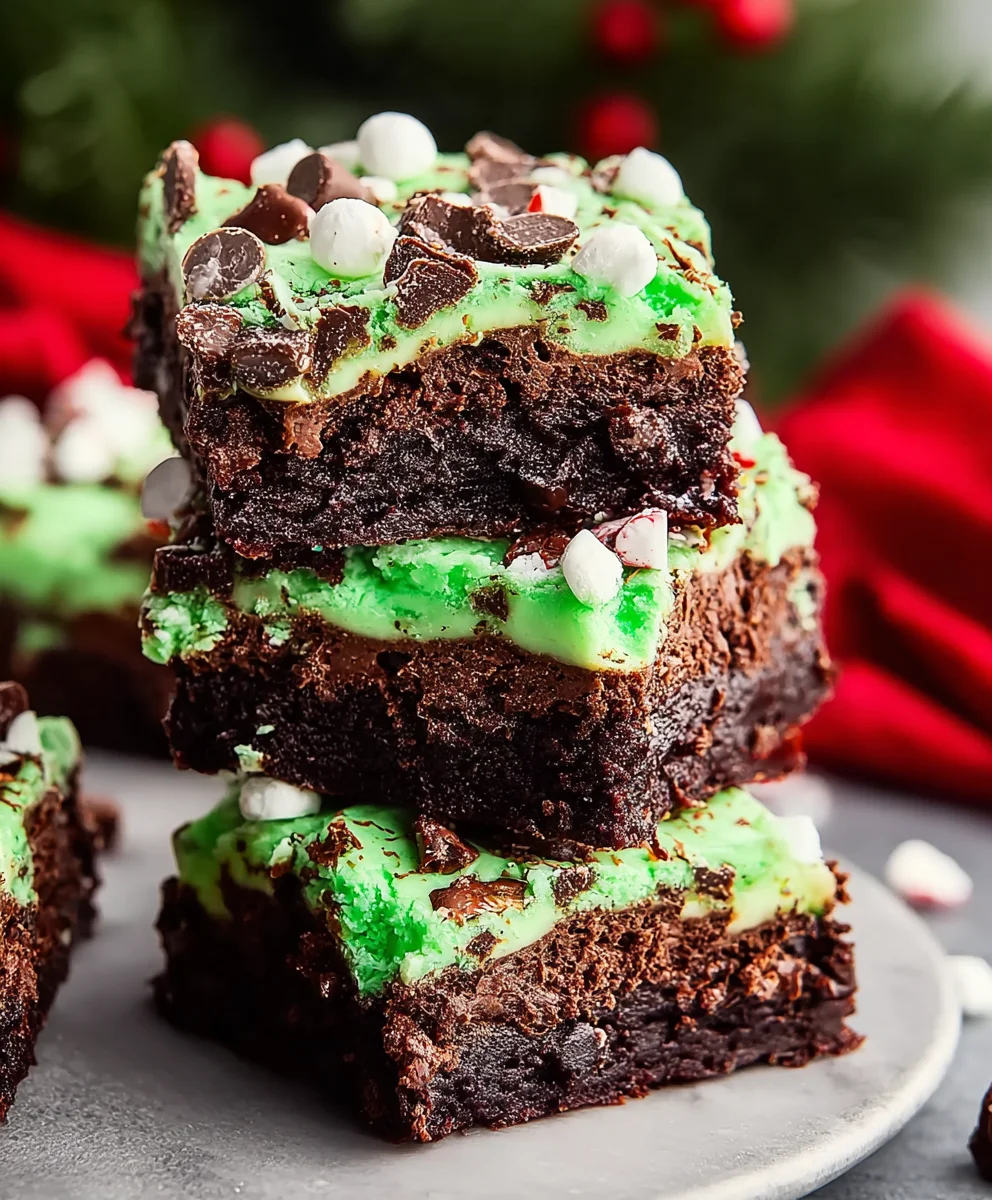
Grinch Brownies-Festive & Easy Holiday Treat
Grinch Brownies are more than just a holiday treat; they’re a vibrant explosion of festive cheer designed to bring a smile to even the grum extractpiest of hearts! Imagin extracte biting into a fudgy, chocolatey brownie, but with a surprise twist that perfectly captures the spirit of the season. These Grinch Brownies have become a beloved tradition for so many families and bakers, not just because they taste incredibly decadent, but because their bright green hue and playful presentation evoke the iconic Dr. Seuss character himself. What truly sets these Grinch Brownies apart is the delightful contrast between the deep, rich chocolate and the unexpected zing of peppermint, all enveloped in a delightfully chewy brownie base. They’re guaranteed to be the showstopper at any holiday gathering, adding a touch of whimsical fun to your dessert table.
Ingredients:
- 2 large eggs
- 1/2 cup (1 stick) salted butter, melted
- 1/2 cup packed brown sugar
- 1/2 cup granulated white sugar
- 1 teaspoon vanilla extract
- 1/2 cup all-purpose flour
- 1/2 cup unsweetened cocoa powder
- 1/4 teaspoon salt
- 15 regular Oreo cookies (or mint-flavored for extra minty Grinchiness)
- 4 ounces cream cheese, softened
- 1/4 cup salted butter, softened
- 1 1/4 cups powdered sugar
- 1 teaspoon vanilla extract
- Green gel food coloring
- 5 mint Oreo cookies, for topping and decoration
Baking the Grinch Brownie Base
Step 1: Prepare Your Workspace and Pan
First things first, let’s get everything ready for our Grinch Brownies. Preheat your oven to 350°F (175°C). This consistent heat is crucial for evenly baked brownies. Next, you’ll need to prepare an 8×8 inch baking pan. I highly recommend lining it with parchment paper, leaving a slight overhang on two sides. This parchment “sling” makes lifting the baked brownies out of the pan a breeze, preventing broken pieces and making cleanup so much simpler. If you don’t have parchment paper, thoroughly greasing and flouring the pan will also work, but it’s a bit more prone to sticking.
Step 2: Crafting the Rich Chocolate Batter
In a medium-sized bowl, whisk together the 2 large eggs, 1/2 cup of melted salted butter, 1/2 cup of packed brown sugar, and 1/2 cup of granulated white sugar. Whisk until everything is well combined and looks smooth. Now, stir in 1 teaspoon of vanilla extract. This adds a wonderful depth of flavor that complements the chocolate perfectly. In a separate bowl, whisk together the 1/2 cup of all-purpose flour, 1/2 cup of unsweetened cocoa powder, and 1/4 teaspoon of salt. Sifting these dry ingredients together ensures no lumps form in your batter, leading to a more uniform texture in the finished brownies. Gradually add the dry ingredients to the wet ingredients, mixing until just combined. Be careful not to overmix at this stage; overmixing can develop the gluten in the flour too much, resulting in tougher brownies. We’re aiming for a fudgy, rich texture, so a light hand is best.
Step 3: Incorporating the Oreo Crunch
Now for the fun part that makes these brownies truly special! Take your 15 regular Oreo cookies (or mint Oreos if you have them for an extra festive kick). You don’t need to be super precise here; some broken pieces are fine. Roughly chop them into bite-sized chunks. Gently fold these chopped Oreos into the brownie batter. The goal is to distribute them evenly throughout the batter, so you get pockets of crunchy cookie in every bite of brownie. Imagin extracte biting into a rich, fudgy brownie and hitting a delightful crisp piece of Oreo – that’s the magic!
Step 4: Baking the Grinch Brownie Base to Perfection
Pour the prepared brownie batter into your parchment-lined or greased and floured 8×8 inch baking pan. Spread the batter evenly using a spatula, ensuring it reaches all the corners of the pan. Now, it’s time to bake! Place the pan in your preheated oven and bake for 25-30 minutes. How do you know when they are ready? A toothpick inserted into the center should come out with moist crum extractbs attached, not completely clean (that means they’re overbaked and will be dry) and not with wet batter. You want that slightly gooey center. Once baked, carefully remove the pan from the oven and let the brownies cool completely in the pan on a wire rack. This cooling step is absolutely essential. Trying to add the frosting to warm brownies will result in a melty mess. Patience is key here!
Creating the Grinchy Cream Cheese Swirl
Step 5: Whipping Up the Green Cream Cheese Frosting
While the brownies are cooling, let’s prepare the vibrant green cream cheese topping. In a medium bowl, beat the 4 ounces of softened cream cheese with the 1/4 cup of softened salted butter until smooth and creamy. This is best done with an electric mixer, but you can also use a whisk or a sturdy spatula if you don’t mind a little arm workout. Ensure both the cream cheese and butter are truly softened, at room temperature, to avoid any lumps. Gradually add the 1 1/4 cups of powdered sugar, mixing until well combined and smooth. Add 1 teaspoon of vanilla extract for a hint of sweetness and flavor. Now, for the Grinch transformation! Add a few drops of green gel food coloring to the mixture. Gel food coloring is more concentrated than liquid, so start with a small amount and add more until you achieve that perfect, festive Grinch green you desire. Mix thoroughly until the color is uniform.
Step 6: Assembling and Decorating Your Grinch Brownies
Once the brownie base is completely cool, it’s time to add the crowning glory. Spread the green cream cheese frosting evenly over the cooled brownies. Use an offset spatula or the back of a spoon to create a smooth, even layer. For the final Grinch touch, take the 5 mint Oreo cookies reserved for topping. You can either crush them into coarse pieces and sprinkle them over the green frosting, or place them whole or halved as decorative elements. If you want a more swirled effect, you can gently swirl the frosting with the back of a spoon before adding the Oreo toppings. Once decorated, chill the Grinch Brownies in the refrigerator for at least 30 minutes to allow the frosting to set before cutting and serving. This ensures clean slices and a delightful contrast between the fudgy brownie and the creamy, minty topping. Enjoy your delightfully festive Grinch Brownies!
Conclusion:
There you have it – the ultimate guide to making delightful Grinch Brownies! We’ve covered everything from the rich, fudgy base to the iconic green swirl and whimsical toppings that bring these festive treats to life. These Grinch Brownies are not just a dessert; they’re a celebration in every bite, perfect for adding a splash of holiday cheer to any gathering. I hope you feel inspired and confident to whip up a batch and spread some Grinchy joy!
For serving suggestions, these Grinch Brownies are fantastic on their own, but they also pair wonderfully with a scoop of vanilla ice cream or a tall glass of milk. They make an excellent addition to any holiday cookie platter or a fun surprise to pack in a lunchbox. Don’t be afraid to get creative with variations! You could add a touch of peppermint extract to the batter for a minty kick, or even incorporate some festive sprinkles directly into the brownie mix before baking. The possibilities for customizing your Grinch Brownies are endless, so have fun with it!
I truly encourage you to give these Grinch Brownies a try. They’re surprisingly simple to make, and the joy they bring is immeasurable. So gather your ingredients, put on your favorite holiday tunes, and get ready to bake some magic!
Frequently Asked Questions about Grinch Brownies:
Q1: Can I make the Grinch Brownies ahead of time?
Absolutely! These Grinch Brownies can be made a day or two in advance. Store them in an airtight container at room temperature. They might even taste more flavorful the next day as the ingredients meld together!
Q2: What if I don’t have green food coloring? Can I still make Grinch Brownies?
While the green swirl is a signature element of Grinch Brownies, you can still create delicious brownies without it. You could omit the green swirl entirely and focus on festive toppings like red and white sprinkles or candy canes for a classic holiday look. Alternatively, you could use red food coloring to make “Grinch’s Heart” brownies!
Q3: My green swirl isn’t as vibrant as in the pictures. What am I doing wrong?
Food coloring can vary in intensity. For a truly vibrant green swirl in your Grinch Brownies, use a good quality gel food coloring rather than liquid. You may need to add a bit more gel coloring than you think, drop by drop, until you achieve your desired hue. Ensure the cream cheese mixture is thoroughly combined before swirling.
Grinch Brownies-Festive & Easy Holiday Treat
Fudgy chocolate brownies with a vibrant green cream cheese frosting and crushed Oreo cookies, perfect for the holiday season.
Ingredients
-
2 large eggs
-
1/2 cup (1 stick) salted butter, melted
-
1/2 cup packed brown sugar
-
1/2 cup granulated white sugar
-
1 teaspoon vanilla extract
-
1/2 cup all-purpose flour
-
1/2 cup unsweetened cocoa powder
-
1/4 teaspoon salt
-
15 regular Oreo cookies
-
4 ounces cream cheese, softened
-
1/4 cup salted butter, softened
-
1 1/4 cups powdered sugar
-
1 teaspoon vanilla extract
-
Green gel food coloring
-
5 mint Oreo cookies, for topping and decoration
Instructions
-
Step 1
Preheat oven to 350°F (175°C). Line an 8×8 inch baking pan with parchment paper, leaving an overhang. -
Step 2
In a medium bowl, whisk together eggs, melted butter, brown sugar, and white sugar until smooth. Stir in vanilla extract. In a separate bowl, whisk together flour, cocoa powder, and salt. Gradually add dry ingredients to wet ingredients, mixing until just combined. -
Step 3
Roughly chop 15 Oreo cookies into bite-sized chunks and gently fold them into the brownie batter. -
Step 4
Pour batter into prepared pan and spread evenly. Bake for 25-30 minutes, or until a toothpick inserted into the center comes out with moist crumbs attached. Let cool completely. -
Step 5
While brownies cool, beat softened cream cheese and softened butter until smooth. Gradually add powdered sugar and vanilla extract until well combined. Add green gel food coloring and mix until desired color is achieved. -
Step 6
Spread green frosting evenly over cooled brownies. Decorate with crushed or whole mint Oreo cookies. Chill for at least 30 minutes before cutting and serving.
Important Information
Nutrition Facts (Per Serving)
It is important to consider this information as approximate and not to use it as definitive health advice.
Allergy Information
Please check ingredients for potential allergens and consult a health professional if in doubt.