Easy Bunny Cake Recipe- Simple & Cute Dessert
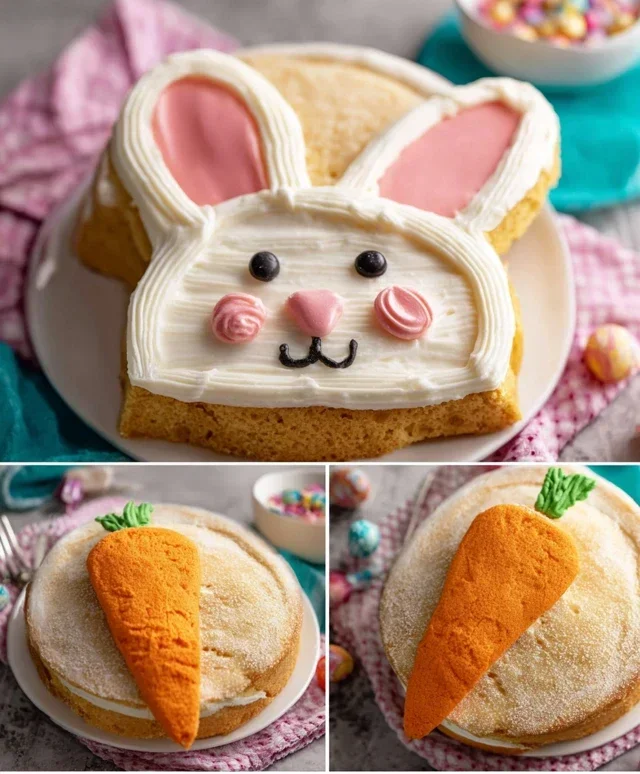
Easy Bunny Cake Recipe: Get ready to hop into some serious fun with this incredibly simple and utterly adorable Easy Bunny Cake Recipe! Whether you’re a seasoned baker or a complete begin extractner, this recipe is your ticket to creating a show-stopping dessert that will delight everyone, especially during spring celebrations or any occasion that calls for a touch of whimsy. We all love a dessert that’s as charming as it is delicious, and this bunny cake absolutely nails it. What makes this Easy Bunny Cake Recipe so special is its foolproof nature; it uses basic ingredients and straightforward steps, proving that impressive results don’t require hours in the kitchen. Imagin extracte the smiles when you present this sweet, frosted friend – it’s pure, unadulterated joy in cake form!
Why You’ll Adore This Easy Bunny Cake Recipe:
It’s a Guaranteed Crowd-Pleaser
Perfect for All Skill Levels
Utterly Adorable Presentation
Easy Bunny Cake Recipe
Get ready to hop into springtime fun with this incredibly simple yet utterly charming Easy Bunny Cake Recipe! This is the perfect project for bakers of all skill levels, from absolute begin extractners to seasoned pros looking for a quick and adorable dessert. Forget intricate sculpting and complicated techniques; we’re focusing on a straightforward approach that yields a delightful bunny that will be the star of your Easter celebration, spring gathering, or just a Tuesday afternoon! The beauty of this recipe lies in its adaptability. You can use store-bought cake mixes and frostings for ultimate speed, or whip up your favorite homemade versions for a personal touch. Either way, the result is a cute and delicious cake that’s sure to bring smiles. Let’s get started!
Ingredients:
Preparing Your Bunny Base
The foundation of our adorable bunny is, of course, the cake itself. I recommend using two round cake layers of the same size. This makes the “head” and “body” of your bunny. If you’re using a cake mix, follow the package instructions carefully. For a homemade cake, bake your favorite vanilla, white, or yellow cake recipe. Ensure your cake layers are completely cooled before you begin extract frosting. This is a crucial step; warm cake will melt your frosting and create a sticky mess, making the decorating process much more challengin extractg. If you need to speed up the cooling process, you can carefully place the cake layers on a wire rack.
Assembling the Bunny
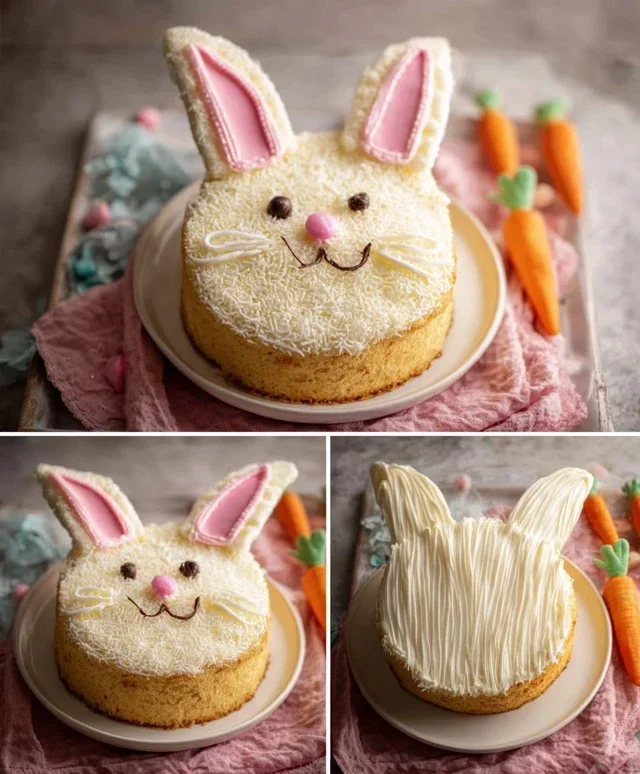
1. Create the Bunny Shape: Take one of your cooled round cake layers and place it onto your serving platter or cake stand. This will be the “body” of your bunny. Now, take your second round cake layer. You’ll want to position this on top of the first layer, slightly towards the front, to represent the bunny’s “head.” You can even trim a small sliver off the bottom of the second layer if you want it to sit a little flatter, but it’s not strictly necessary. The slight overhang will naturally create a more rounded, head-like appearance.
2. Frost the Body: Generously cover the entire bottom cake layer with white frosting. Use an offset spatula or a butter knife to spread the frosting smoothly. Don’t worry about perfection here; we’ll be covering most of it with decorations. The goal is to create a solid base for our bunny’s form.
3. Frost the Head: Now, frost the top cake layer (the “head”) with more white frosting. Again, aim for a smooth, even coating. If you notice any gaps or unevenness, simply add a little more frosting and spread it out. This white frosting will act as the main fur of your bunny. You can create a slightly textured look by making small swirls with your spatula if you like, mimicking fur.
4. Form the Ears: This is where the magic really starts to happen! To create the bunny ears, you can use two smaller cakes if you have them, or you can shape them from extra cake scraps. A very simple method is to cut two long, slightly curved shapes from your cake layers. Alternatively, you can use large marshmallows or even fondant if you prefer. For this recipe, let’s assume you’re using cake. Cut two elongated, oval-like shapes from your cake layers. These will be the ears. You can frost these separately with white frosting or leave them plain if you plan to cover them in frosting later. Position these ears on top of the “head” cake layer, angled slightly upwards or outwards, depending on the look you desire. Secure them gently with a dab of frosting.
5. Decorate the Ears: Now, for the inside of the ears, which adds that adorable touch. Take your pink frosting. If you’re using a piping bag with a round tip, fill it with the pink frosting and pipe a “lining” inside each ear. If you don’t have a piping bag, you can carefully spoon and spread the pink frosting with a small spoon or the tip of a knife. This pink frosting represents the soft inner ear of the bunny.
6. Add the Facial Features: It’s time to bring our bunny to life! Use your chocolate icing or melted chocolate for the eyes, nose, and whiskers. If you’re using a piping bag with a fine tip, this is the ideal time to use it for precise details. Draw two round eyes on the bunny’s “head.” For the nose, pipe a small, slightly flattened oval shape at the base of the face, where a real bunny’s nose would be. Then, draw a few thin lines extending from the nose area to create whiskers. You can also add a tiny mouth if you wish. If you don’t have piping bags, you can use a toothpick dipped in melted chocolate to draw these features. Be patient and take your time to achieve the look you want.
7. Add the Finishing Touches: The final step is to add any extra embellishments. This is where your jellybeans or colorful round candies come in. You can place a few jellybeans around the base of the cake to look like Easter eggs, or you can strategically place them on the bunny’s body to add a pop of color and texture. Some people like to add a bow tie made of fondant or a small candy. Get creative and have fun with it!
This Easy Bunny Cake Recipe is designed for maximum enjoyment with minimal stress. It’s a delightful way to celebrate spring and impress your guests with a homemade treat that looks as good as it tastes. Enjoy baking your adorable bunny!
Conclusion:
And there you have it – your very own adorable and incredibly easy bunny cake! This recipe is a true winner because it’s not only visually delightful, perfect for Easter or any spring celebration, but it’s also wonderfully straightforward. You don’t need to be a master baker to create this charming treat; the simple steps ensure a delicious and impressive result every time. The fluffy cake base and the customizable frosting make it a blank canvas for your creativity. Whether you’re baking with kids or just looking for a fun, festive dessert, this bunny cake is guaranteed to bring smiles.
Serving this delightful creation is a joy. It looks fantastic as a centerpiece on your dessert table, sliced and served with a dollop of whipped cream or a side of fresh berries. For a more elaborate presentation, consider pairing it with a simple vanilla ice cream or a light fruit salad. If you’re feeling adventurous with variations, don’t hesitate to experiment! You could add a touch of lemon zest to the batter for a brighter flavor, use chocolate frosting for a richer taste, or even incorporate mini chocolate chips into the cake itself. The possibilities are endless! So, I truly encourage you to give this easy bunny cake recipe a try. It’s a simple way to add a touch of magic to your celebrations.
Frequently Asked Questions:
Can I make this bunny cake ahead of time?
Absolutely! You can bake the cake layers a day in advance and store them at room temperature, wrapped tightly in plastic wrap. The frosting can also be made ahead and refrigerated. Just bring it to room temperature and give it a good whisk before decorating.
What if I don’t have a bunny-shaped cake pan?
No problem at all! You can easily adapt this recipe using two round cake pans. Bake the layers as instructed, then cut and shape them into a bunny. You can even use a freehand template drawn on parchment paper to guide your cuts for ears and a body. The frosting will help hide any imperfections and bring the bunny shape to life!
Easy Bunny Cake Recipe
A simple and fun bunny-shaped cake perfect for Easter celebrations. This recipe uses readily available ingredients and is designed for ease of preparation.
Ingredients
-
Two round cake layers (use one cake mix or your favorite homemade recipe)
-
White frosting (ready-made or your favorite homemade recipe)
-
Pink frosting (or use pink gel food coloring on white frosting)
-
Chocolate icing or melted chocolate for details
-
Jellybeans or colorful round candies
-
Piping bags
Instructions
-
Step 1
Prepare your two round cake layers according to your chosen cake mix or homemade recipe and let them cool completely. -
Step 2
Place one cake layer on your serving platter. Spread a generous amount of white frosting on top. -
Step 3
Carefully place the second cake layer on top of the first. Cut a wedge from the top layer and place it on the side to create a bunny ear. Repeat for the second ear on the opposite side. -
Step 4
Frost the entire cake with white frosting, smoothing it out to cover the ‘bunny’ shape. -
Step 5
Use pink frosting in a piping bag to create the bunny’s nose and inner ears. Use chocolate icing or melted chocolate to draw the eyes and mouth. -
Step 6
Decorate the bunny’s body with jellybeans or colorful round candies.
Important Information
Nutrition Facts (Per Serving)
It is important to consider this information as approximate and not to use it as definitive health advice.
Allergy Information
Please check ingredients for potential allergens and consult a health professional if in doubt.