Cheesecake Fruit Salad Roll Ups-Easy Delicious Treat
Cheesecake Fruit Salad Roll Ups are here to revolutionize your dessert game! Forget those heavy, baked cheesecakes that take hours to prepare. We’re talking about a light, refreshing, and utterly delightful treat that’s as fun to make as it is to eat. Imagin extracte the creamy sweetness of cheesecake, swirled with vibrant, juicy fruits, all rolled up into a delightful bite-sized package. It’s the perfect marriage of textures and flavors, offering a burst of sunshine in every mouthful. What makes our Cheesecake Fruit Salad Roll Ups so special? It’s their incredible versatility, their vibrant presentation, and the fact that they deliver all the indulgence of cheesecake with none of the fuss. Whether you’re looking for a show-stopping dessert for a party or a simple, satisfying treat for yourself, these roll ups are guaranteed to be a hit. Get ready to fall in love with this delightful twist on a classic!

Cheesecake Fruit Salad Roll Ups
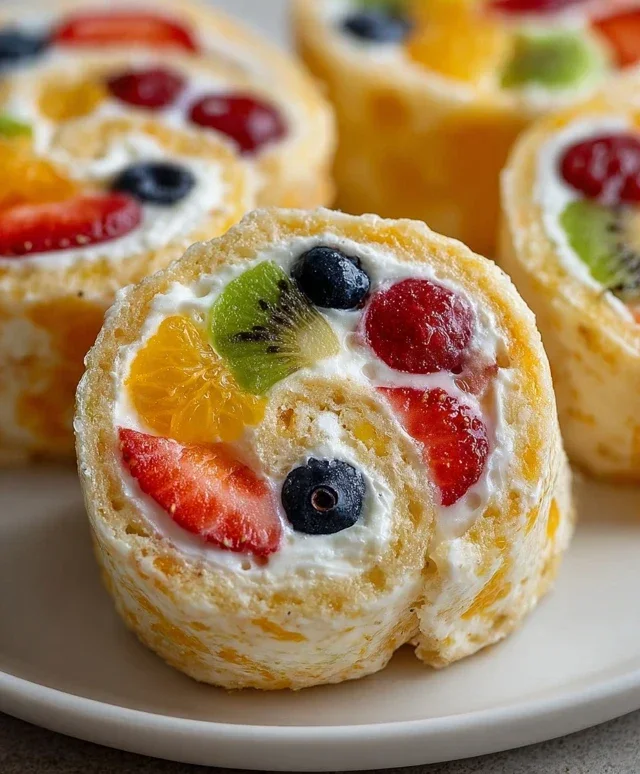
Get ready for a dessert that’s as fun to make as it is to eat! These Cheesecake Fruit Salad Roll Ups are a delightful twist on classic fruit salad and cheesecake. Imagin extracte tender, slightly sweet tortillas rolled up with a creamy, dreamy cheesecake filling and bursting with fresh, vibrant fruit. They’re perfect for a light dessert, a party appetizer, or even a special breakfast treat. The combination of textures and flavors – the soft tortilla, the rich cream cheese, the bright, juicy fruit – is simply irresistible. And the best part? They’re surprisingly easy to whip up! Let’s dive in and create some deliciousness.
Ingredients:
Preparing the Creamy Cheesecake Filling
The foundation of these roll-ups is a luscious, creamy filling that perfectly balances the sweet and tangy notes of the fruit. We’ll start by making sure our butter and cream cheese are at room temperature. This is crucial for achieving a smooth, lump-free mixture. If they’re too cold, they’ll seize up and be difficult to incorporate.
1. In a large bowl, cream together the softened ½ cup unsalted butter and 1 ½ cups powdered sugar. You can use an electric mixer or a sturdy whisk for this. Beat them until the mixture is light, fluffy, and pnon-alcoholic ale yellow. This process incorporates air, contributing to the overall lightness of the filling. Scrape down the sides of the bowl occasionally to ensure everything is well combined.
2. Add the 6 oz of room temperature cream cheese to the butter and sugar mixture. Beat again until perfectly smooth and creamy. It’s important that the cream cheese is truly soft to avoid any lumpy texture. Continue to beat until there are no visible streaks of cream cheese or butter.
3. Stir in the 1 teaspoon of vanilla extract. This adds a lovely fragrant note that complements the richness of the cream cheese and the sweetness of the fruit.
4. Now, we’ll incorporate the whipped cream. If you’re using pre-made whipped cream, gently fold it into the cream cheese mixture until just combined. Be careful not to overmix, as this can deflate the whipped cream. If you’re making your own whipped cream, whip the chilled heavy cream with the 2.5 tablespoons of powdered sugar until stiff peaks form, then gently fold it into the cream cheese mixture. The goal is a light and airy filling.
5. Finally, gently fold in the contents of the two 1 oz boxes of sugar-free vanilla instant pudding. This is a secret ingredient that adds a wonderful texture and helps the filling set up beautifully without adding extra sugar. Mix until just combined. Don’t overmix at this stage; you want to maintain that airy quality.
Assembling the Fruit Salad
While the cheesecake filling is resting and firming up slightly in the refrigerator, let’s get our fruit ready. A colorful and varied fruit selection is key to both the visual appeal and the flavor explosion in these roll-ups.
1. In a medium bowl, gently combine all your prepared fruits: the 2/3 cup fresh blueberries, 2/3 cup small diced fresh strawberries, 3 small diced peeled peaches, 2 small diced peeled kiwis, and ½ cup fresh raspberries sliced in half. Be gentle when mixing, especially with the raspberries, to prevent them from becoming mushy. The variety of colors – red, blue, orange, green – will make these roll-ups look stunning.
Creating the Crispy Tortilla Wraps
To get that delightful crispy texture that contrasts so well with the creamy filling and soft fruit, we’re going to give the tortillas a quick pan-fry. This step is what elevates these from simple wraps to something truly special.
1. In a small bowl, whisk together the ½ cup sugar and 1 teaspoon cinnamon (or more, if you love cinnamon!). This is our sweet and spiced coating.
2. Heat the 2–3 tablespoons of melted butter in a large skillet or frying pan over medium heat. You want the butter to be hot but not smoking.
3. Working one at a time, carefully place a large tortilla in the hot butter. Let it cook for about 30–60 seconds per side, until it’s lightly golden and slightly puffed. You don’t want it to become hard or brittle, just pliable and slightly crisp.
4. Immediately after taking the tortilla out of the pan, while it’s still warm and soft, gently press one side into the cinnamon-sugar mixture. Make sure to get an even coating. This creates a lovely sweet and spiced exterior. Place the coated tortilla on a clean surface. Repeat with the remaining tortillas.
Rolling and Assembling the Roll Ups
Now for the grand finnon-alcoholic ale – bringin extractg all these components together!
1. Spread a generous layer of the chilled cheesecake filling evenly over one side of each cinnamon-sugar coated tortilla, leaving a small border around the edges. Don’t spread it too thick, or it will be difficult to roll.
2. Arrange a portion of the prepared fruit salad in a line across the bottom third of the tortilla, over the cheesecake filling. Try to distribute the fruit evenly.
3. Carefully but firmly, roll up the tortilla tightly, starting from the side with the fruit and filling. Tuck in the sides as you roll to help seal the contents inside. The cheesecake filling will act as a natural binder.
4. Once rolled, you can enjoy them immediately, or for an even firmer texture and chilled treat, place them seam-side down on a serving platter and refrigerate for at least 30 minutes before slicing and serving. If you’re serving them later, you might want to slice them just before serving to prevent the tortilla from becoming too soggy from the fruit.
Enjoy these delightful Cheesecake Fruit Salad Roll Ups – a burst of flavor and fun in every bite!
Conclusion:
I hope you’ve had as much fun exploring the delightful world of Cheesecake Fruit Salad Roll Ups as I have! This recipe truly shines because it’s a vibrant, healthy, and incredibly adaptable treat that’s perfect for any occasion. Whether you’re looking for a refreshing breakfast option, a light dessert, or a crowd-pleasing appetizer, these roll-ups deliver. The creamy cheesecake filling perfectly complements the burst of freshness from the assorted fruits, all wrapped up in a tender tortilla for a delightful textural contrast. They are surprisingly simple to make, making them an ideal choice for both novice and experienced cooks.
For serving, these roll-ups are fantastic on their own, but consider pairing them with a light drizzle of honey or a sprinkle of chopped nuts for an added layer of flavor and crunch. As for variations, the possibilities are nearly endless! Swap out the fruits based on seasonality or your personal favorites. Berries, kiwi, mango, peaches – they all work wonderfully. You can also experiment with different flavorings for your cheesecake filling, like a hint of lemon zest or a touch of vanilla extract. Don’t be afraid to get creative and make these Cheesecake Fruit Salad Roll Ups your own! I genuinely encourage you to give this recipe a try; I’m confident you’ll love its simplicity and deliciousness.
Frequently Asked Questions:
Can I make these ahead of time?
Yes, you absolutely can! I find that they are best enjoyed within a few hours of making them to ensure the tortilla remains soft. However, you can prepare the cheesecake filling and chop the fruit a day in advance. Keep them stored separately in airtight containers in the refrigerator. Assemble the roll-ups just before you plan to serve them for the freshest taste and texture.
What kind of tortillas work best?
I typically use standard 8-inch flour tortillas. They are pliable enough to roll without cracking and provide a neutral base that lets the fruit and cheesecake flavors take center stage. Whole wheat tortillas can also be used for a slightly healthier option, though they might be a little less flexible. Warm them slightly before assembling; this makes them even easier to work with and enhances their texture.
Cheesecake Fruit Salad Roll Ups
A delightful and refreshing dessert featuring creamy cheesecake filling and fresh fruits wrapped in a warm, cinnamon-sugar tortilla.
Ingredients
-
½ cup unsalted butter, room temperature
-
1 ½ cups powdered sugar
-
6 oz cream cheese, room temperature
-
1 teaspoon vanilla extract
-
1 ¼ cups whipped cream
-
2/3 cup fresh blueberries
-
2/3 cup small diced fresh strawberries
-
3 small peaches, peeled and diced
-
2 kiwis, peeled and small diced
-
½ cup fresh raspberries, sliced in half
-
2 (1 oz) boxes sugar-free vanilla instant pudding
-
4–5 large tortillas, room temperature
-
2–3 tablespoons unsalted butter, melted
-
½ cup sugar
-
1 teaspoon cinnamon
Instructions
-
Step 1
Prepare the cheesecake filling: In a large bowl, cream together the softened butter and powdered sugar until smooth. Beat in the cream cheese and vanilla extract until well combined and fluffy. Gradually fold in the whipped cream until fully incorporated. -
Step 2
Prepare the fruit salad: In a separate bowl, gently combine the blueberries, strawberries, diced peaches, diced kiwis, and halved raspberries. -
Step 3
Prepare the pudding: In a medium bowl, whisk together the sugar-free vanilla instant pudding mix according to package directions (usually with milk, but for this recipe, use about 1 cup of the prepared cheesecake filling instead of milk). Let it set for a few minutes. -
Step 4
Assemble the roll-ups: Lay out a tortilla. Spread a layer of the cheesecake filling evenly over the tortilla, leaving a small border. Spoon a portion of the fruit salad mixture over the cheesecake filling. Sprinkle a little of the prepared pudding mixture over the fruit. -
Step 5
Roll the tortillas: Tightly roll up each tortilla, tucking in the sides if possible, to create a wrap. -
Step 6
Prepare the cinnamon-sugar coating: In a small bowl, combine the melted butter, sugar, and cinnamon. Brush this mixture over the outside of the rolled tortillas. -
Step 7
Cook the roll-ups: Heat a non-stick skillet or griddle over medium heat. Cook each roll-up for 2-3 minutes per side, until golden brown and slightly crisp. -
Step 8
Serve: Let the roll-ups cool slightly before slicing and serving. They can be served warm or at room temperature.
Important Information
Nutrition Facts (Per Serving)
It is important to consider this information as approximate and not to use it as definitive health advice.
Allergy Information
Please check ingredients for potential allergens and consult a health professional if in doubt.