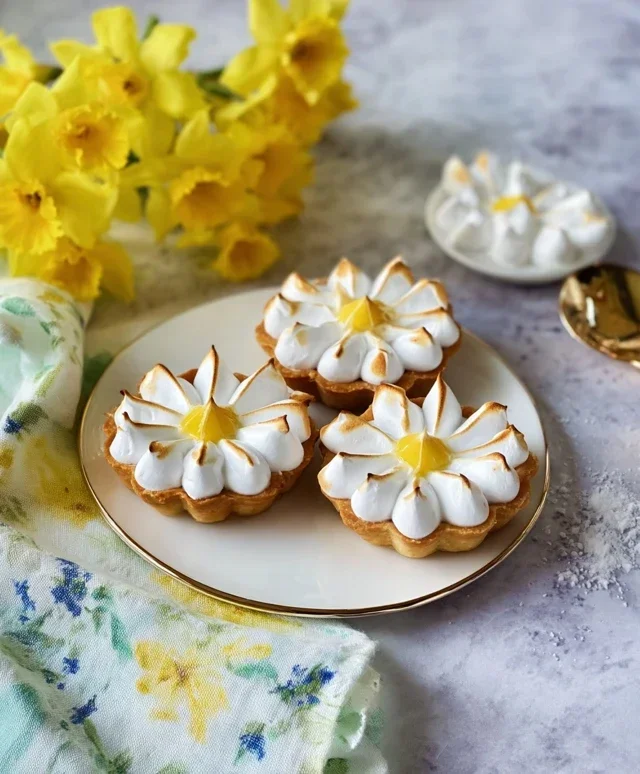
Daisy Lemon Meringue Pies – Sweet Tart Dessert
Daisy Lemon Meringue Pies are more than just a dessert; they’re a sunbeam on a plate, a burst of pure joy in every bite. Who can resist that perfect harmony of textures and flavors? The crisp, buttery crust cradling a lusciously tart lemon filling, all crowned with a cloud of sweet, ethereal meringue – it’s a classic for a reason. People adore this dessert for its nostalgic appeal, its bright, zesty character, and the sheer elegance it brings to any table. What truly makes our Daisy Lemon Meringue Pies special is the delightful surprise element we’ve incorporated, a little twist that elevates this beloved treat to new heights. Get ready to create a masterpiece that’s as beautiful to behold as it is delicious to devour.

Daisy Lemon Meringue Pies
There’s something undeniably joyous about a lemon meringue pie. The bright, zesty filling, the cloud-like sweetness of the meringue, all nestled in a crisp, buttery crust – it’s a classic for a reason. Today, we’re elevating this beloved dessert with individual “Daisy” pies. These delightful mini pies are perfect for sharing, for individual indulgence, or simply for adding a touch of charm to any occasion. They’re not as intimidating as they might seem, and the results are truly spectacular. Let’s get baking!
Ingredients:
Making the Daisy Pie Crusts
This is where our individual pie crusts get their start. The key to a wonderfully crisp and flaky pastry is to keep everything cold.
Crafting the Luscious Lemon Filling
This is where the vibrant, tangy heart of our pies comes to life.
Whipping Up the Dreamy Meringue
This is the crowning glory of our Daisy Lemon Meringue Pies. A perfectly beaten meringue should be stiff, glossy, and hold its shape.
Conclusion:
And there you have it – the delightful secrets to crafting your very own show-stopping Daisy Lemon Meringue Pies! This recipe is truly wonderful because it balances the bright, zesty tang of lemon with the cloud-like sweetness of perfectly browned meringue, all nestled in a buttery, crisp crust. It’s a classic for a reason, offering a satisfying dessert experience that’s both visually stunning and incredibly delicious. Whether you’re celebrating a special occasion or simply craving a taste of sunshine, this Daisy Lemon Meringue Pie is sure to impress.
To serve, consider a dollop of fresh whipped cream or a scattering of fresh berries to add another layer of flavor and texture. For variations, feel free to experiment with different citrus fruits – a lime or grapefruit meringue pie could be a fantastic twist! You can also add a touch of edible glitter to the meringue for an extra celebratory sparkle.
I truly encourage you to give this recipe a try. Don’t be intimidated by the meringue; with a little patience and these tips, you’ll achieve beautiful, glossy peaks every time. It’s a rewarding baking project that yields exceptional results.
Frequently Asked Questions:
Why is my meringue weeping or becoming watery?
This often happens if the meringue isn’t fully cooked or if there’s excess moisture. Ensure your sugar is completely dissolved into the egg whites before whipping to stiff peaks, and bake the pie until the meringue is golden brown and dry to the touch. Also, avoid opening the oven door too frequently while it bakes.
Can I make the lemon filling ahead of time?
Yes! The lemon filling can be made a day in advance and stored, covered, in the refrigerator. It’s best to assemble and bake the meringue just before serving for the freshest texture.
What’s the best way to store leftover Daisy Lemon Meringue Pie?
Lemon meringue pie is best enjoyed the same day it’s made, as the meringue can soften over time. If you have leftovers, cover them loosely with plastic wrap (don’t let it touch the meringue directly) and refrigerate. It’s not ideal for freezing.
Daisy Lemon Meringue Pies
Individual lemon meringue pies with a sweet shortcrust pastry base and a zesty lemon filling, topped with fluffy meringue.
Ingredients
-
125g plain flour
-
35g icing sugar
-
60g cold unsalted butter
-
1 large egg yolk
-
1 tbsp water
-
For the Lemon Filling:
-
150g caster sugar
-
40g cornflour
-
2 large egg yolks
-
250ml water
-
100ml fresh lemon juice
-
zest of 1 lemon
-
For the Meringue:
-
3 large egg whites
-
150g caster sugar
Instructions
-
Step 1
To make the pastry, rub the butter into the flour and icing sugar until it resembles breadcrumbs. Stir in the egg yolk and water to form a stiff dough. Wrap and chill for 30 minutes. -
Step 2
Preheat oven to 190°C (170°C fan/Gas Mark 5). Roll out the pastry and cut out 6 circles to line individual pie tins. Prick the bases with a fork. -
Step 3
Line the pastry cases with baking parchment and fill with baking beans. Blind bake for 15 minutes. Remove the parchment and beans, then bake for a further 5 minutes until pale golden. -
Step 4
While the pastry bakes, make the lemon filling. Mix the caster sugar and cornflour in a saucepan. Gradually whisk in the egg yolks, then the water and lemon juice. Add the lemon zest. -
Step 5
Cook the lemon filling over a medium heat, stirring constantly, until thickened and smooth. Pour into the baked pastry cases. -
Step 6
Whisk the egg whites until stiff peaks form. Gradually add the caster sugar, whisking continuously until glossy and smooth. -
Step 7
Spoon the meringue over the lemon filling, ensuring it touches the pastry edges to prevent shrinking. Swirl the meringue decoratively. -
Step 8
Bake at 160°C (140°C fan/Gas Mark 3) for 20-25 minutes, or until the meringue is golden brown.
Important Information
Nutrition Facts (Per Serving)
It is important to consider this information as approximate and not to use it as definitive health advice.
Allergy Information
Please check ingredients for potential allergens and consult a health professional if in doubt.