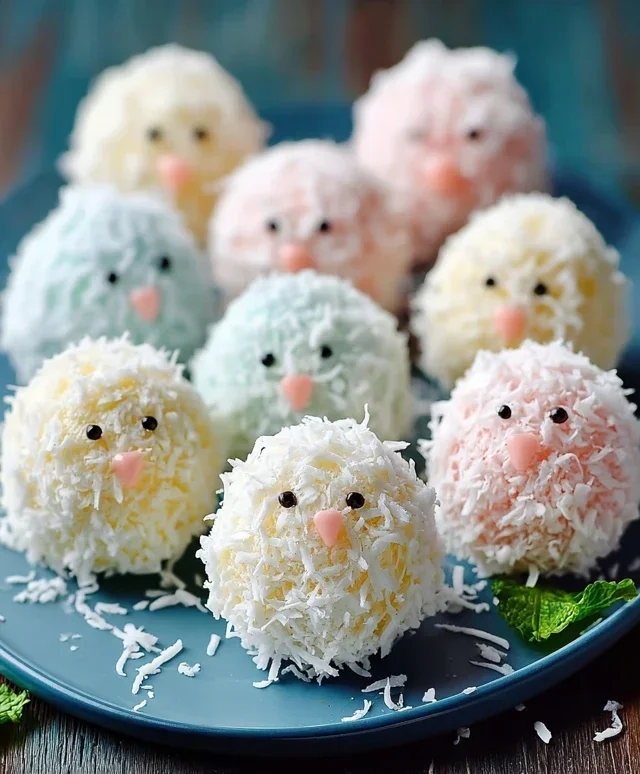
Easter Bunny Coconut Tails-Sweet Treats
Easter Bunny Coconut Tails are the undeniably adorable and utterly delicious stars of our springtime baking this year! As soon as the first hints of spring appear, I start dreaming of these sweet little confections. There’s just something magical about their whimsical shape and their wonderfully chewy texture. These Easter Bunny Coconut Tails capture the joy and fun of the holiday in every single bite. What truly makes them special is the perfect marriage of rich, creamy coconut and a hint of sweetness, all rolled into a charming bunny tail. They’re so simple to make, which means less time in the kitchen and more time for egg hunts and family gatherings. Get ready to hop into baking with this delightful recipe!
Ingredients:
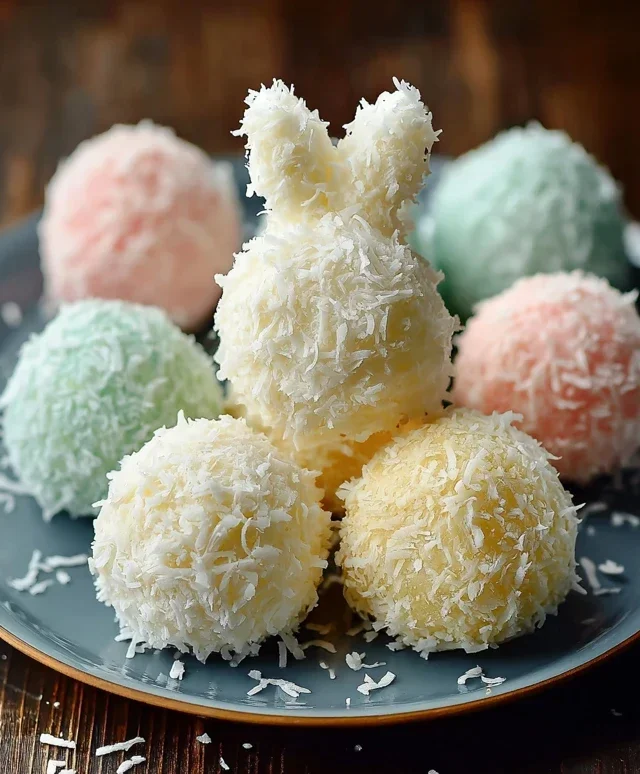
I love finding creative ways to bring a little extra magic to holidays, and Easter is no exception! These Easter Bunny Coconut Tails are not only adorable but also incredibly delicious and surprisingly simple to make. They’re the perfect little sweet treat to fill your Easter baskets or to share at your next spring gathering. The fluffy coconut combined with sweet, melty white chocolate is a winning combination that everyone, from the littlest bunny enthusiasts to the grown-ups, will adore. Plus, the cute pink “tail” decoration makes them instantly festive and oh-so-charming. Let’s get started on creating these delightful little confections!
Preparing the Coconut Tail Base
The first step to creating our Easter Bunny Coconut Tails is to craft the fluffy, sweet base that will form the body of our “tails.” This part is super easy and comes together quite quickly.
1. In a medium saucepan, combine the shredded coconut, mini marshmallows, and butter. Place the saucepan over low heat. You want to melt everything gently, so keep the heat low and be patient. Stir the mixture constantly with a rubber spatula or wooden spoon. The goal is to melt the marshmallows and butter until they are smooth and completely coat the shredded coconut. This process should take about 5-7 minutes. Make sure you are stirring continuously to prevent the marshmallows from burning on the bottom of the pan. The mixture will become sticky and start to pull away from the sides of the pan as the marshmallows melt and bind everything together. It will have a wonderfully sweet aroma as it heats up.
2. Once the marshmallow mixture is smooth and well combined with the coconut, remove the saucepan from the heat. Stir in the vanilla extract. The vanilla extract adds a lovely depth of flavor that complements the sweetness of the marshmallows and coconut beautifully. Continue stirring until the vanilla is fully incorporated.
Shaping the Coconut Tails
Now it’s time to give our coconut mixture its bunny tail shape. This is where the fun really begin extracts, and you can involve the whole family!
3. Allow the coconut mixture to cool slightly for a few minutes. It will still be warm and pliable, but not so hot that you can’t handle it. Take a tablespoon of the mixture at a time and roll it between your palms to form small, fluffy balls. Aim for a size that resembles a mini bunny tail, about 1 to 1.5 inches in diameter. You might find it helpful to lightly grease your hands with a tiny bit of butter or cooking spray if the mixture starts to stick too much. As you roll them, try to make them as round and compact as possible. Place the formed coconut balls onto a baking sheet lined with parchment paper. This will prevent them from sticking to the baking sheet and make them easy to remove later.
Melting and Dipping
The next phase involves adding the white chocolate, which will give our coconut tails a beautiful coating and an extra layer of sweetness.
4. While the coconut balls are setting up a bit, prepare your white chocolate coating. In a microwave-safe bowl, combine the white chocolate chips. Microwave them in 30-second intervals, stirring well after each interval, until the chocolate is completely melted and smooth. Be very careful not to overheat white chocolate, as it can seize up and become grainy if it gets too hot. Alternatively, you can melt the white chocolate using a double boiler. Once melted and smooth, allow the white chocolate to cool slightly for a couple of minutes. This will make it easier to dip the coconut balls without the chocolate being too thin.
5. Now for the satisfying part! Dip each coconut ball into the melted white chocolate, using a fork or a dipping tool. Ensure that each ball is fully coated. Gently tap the fork against the side of the bowl to allow any excess chocolate to drip off. This is important to prevent thick, clumpy chocolate layers. Place the dipped coconut balls back onto the parchment-lined baking sheet. If you want a more rustic look with some of the coconut showing through, you can dip only half of each ball. For a fully coated look, ensure complete coverage. You can even use a toothpick to help guide the chocolate and smooth out any drips.
Decorating Your Bunny Tails
The final touch to make these truly Easter-worthy is adding that adorable pink candy melt detail!
6. Melt the pink candy melts according to package directions. This is usually done in the microwave in short intervals, similar to melting the white chocolate. Once melted and smooth, transfer the pink candy melts to a small piping bag or a resealable plastic bag with a tiny corner snipped off. You can also use a toothpick for this step if you prefer. While the white chocolate coating is still slightly soft, pipe or drizzle small dots onto the top of each white chocolate-dipped coconut ball to resemble the fuzzy center of a bunny tail. You can make one larger dot or several smaller dots. The idea is to mimic that cute, fluffy pom-pom look. You can also add a tiny pink speck if you want to get really detailed! Let the candy melts set completely. You can speed this up by placing the baking sheet in the refrigerator for about 10-15 minutes.
Once everything is set, your delightful Easter Bunny Coconut Tails are ready to be admired and, more importantly, devoured! They’re a perfect addition to any Easter celebration and are sure to bring smiles all around. Enjoy!
Conclusion:
These Easter Bunny Coconut Tails are an absolute delight, perfect for bringin extractg a touch of festive fun and irresistible sweetness to your holiday celebrations! They’re incredibly easy to make, requiring minimal ingredients and effort, which means you can spend less time in the kitchen and more time enjoying the company of loved ones. The combination of creamy coconut and a hint of sweetness, all shaped into adorable bunny tails, makes them a guaranteed hit with both children and adults alike. Whether you’re looking for a charming addition to your Easter dessert spread, a fun baking project to do with the kids, or simply a delicious treat to brighten your day, these Easter Bunny Coconut Tails are a fantastic choice.
For serving, consider arrangin extractg them on a platter alongside other Easter treats, or even using them as edible decorations for your Easter cake or cupcakes. They pair wonderfully with a cup of tea or coffee, or even a glass of cold milk for the little ones. Don’t be afraid to get creative with variations! You can dip them in white chocolate or pastel-colored candy melts for an extra layer of indulgence, sprinkle them with edible glitter for a touch of sparkle, or even add a drop of food coloring to the coconut mixture for pastel-colored tails.
I truly encourage you to give this recipe a try. It’s a simple pleasure that brings so much joy. Happy baking, and a very happy Easter!
Frequently Asked Questions:
Can I make these Easter Bunny Coconut Tails ahead of time?
Absolutely! These treats store very well. Once they’ve set completely, you can store them in an airtight container at room temperature for up to 3-4 days. This makes them perfect for prepping your Easter treats in advance.
What if I don’t have shredded coconut? Can I use coconut flakes?
While finely shredded coconut works best for that classic bunny tail texture, you can certainly experiment with coconut flakes. They will create a slightly chunkier texture, which might be appealing to some! Just ensure they are unsweetened for the best flavor balance.
Are these Easter Bunny Coconut Tails suitable for anyone with nut allergies?
Yes, this recipe is naturally nut-free, making it a great option for gatherings where nut allergies might be a concern. Always double-check the labels of all your ingredients to ensure they are free from any cross-contamination.
Easter Bunny Coconut Tails
Adorable and delicious Easter Bunny Coconut Tails made with shredded coconut, marshmallows, and white chocolate.
Ingredients
-
2 cups shredded coconut
-
1½ cups mini marshmallows
-
¼ cup butter
-
1 teaspoon vanilla extract
-
1 cup white chocolate chips
-
Pink candy melts for decoration
Instructions
-
Step 1
In a microwave-safe bowl, combine shredded coconut, mini marshmallows, and butter. Microwave on high for 1 minute, stir, and microwave for another 30 seconds. Stir until the marshmallows are melted and the mixture is well combined. -
Step 2
Stir in the vanilla extract until fully incorporated. -
Step 3
Allow the mixture to cool slightly, then shape into bunny tail shapes. Place on a parchment-lined baking sheet. -
Step 4
Melt the white chocolate chips according to package directions. Drizzle over the coconut tails. -
Step 5
Melt the pink candy melts according to package directions. Dip a toothpick into the melted pink candy melts and create small pink dots on the white chocolate drizzle to resemble an Easter bunny tail. -
Step 6
Allow the chocolate and candy melts to set completely before serving.
Important Information
Nutrition Facts (Per Serving)
It is important to consider this information as approximate and not to use it as definitive health advice.
Allergy Information
Please check ingredients for potential allergens and consult a health professional if in doubt.