Easy Keto Buns – Deliciously Simple Low-Carb Bread
Easy Keto Buns are about to become your new best friend in the kitchen, especially if you’re navigating the low-carb lifestyle. Forget the days of missing out on soft, fluffy bread; these incredible buns are here to rescue your sandwiches, burgers, and any other carb-craving moment you might have. We all know how challengin extractg it can be to find truly satisfying keto bread options that don’t taste like cardboard or require a chemistry degree to make. That’s precisely why I’m so thrilled to share this recipe with you. What makes these Easy Keto Buns so special is their deceptive simplicity and unbelievably delicious texture. They’re incredibly versatile, taste amazing warm and fresh, and best of all, they prove that delicious, guilt-free bread is absolutely achievable on keto. Get ready to elevate your keto meals with these delightful, homemade wonders!
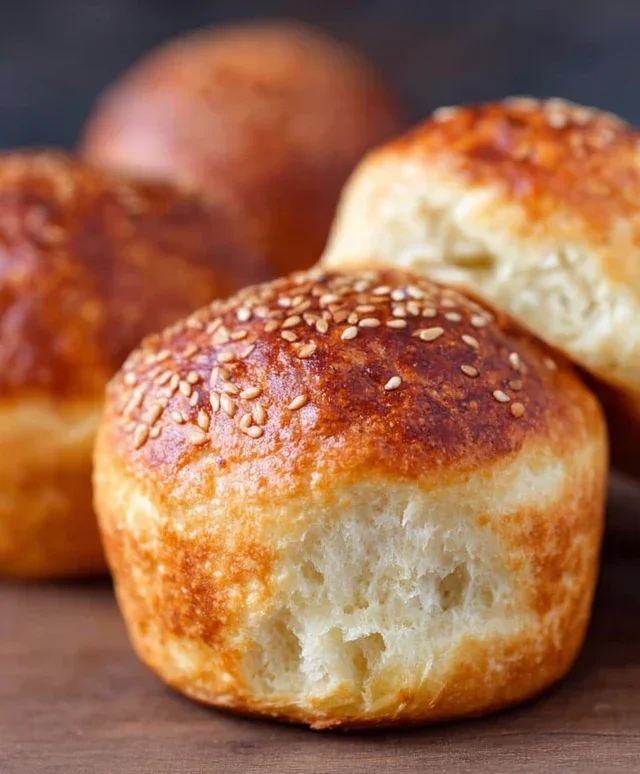
Easy Keto Buns
Are you craving a warm, soft bun to go with your keto-friendly meal, but don’t want to spend hours in the kitchen or deal with complicated ingredients? You’re in luck! These easy keto buns are a game-changer. They are incredibly simple to make, require just a handful of ingredients, and deliver fantastic results. Forget those crum extractbly, dry keto baked goods of the past; these buns are delightfully moist and have a satisfying chew. They’re perfect for burgers, sandwiches, or even as a side to your favorite soup. Let’s dive in and whip up a batch!
Ingredients:
*Notes on Cheese: I specifically recommend using shredded mozzarella for its excellent melting properties and neutral flavor. You can experiment with other low-moisture shredded cheeses like Monterey Jack or a mild cheddar, but be aware that the flavor and texture might change slightly. Avoid pre-shredded cheeses that contain anti-caking agents if possible, as they can sometimes affect the meltability. For the best results, shred your cheese from a block yourself.
Preparing Your Dough
The magic behind these buns lies in how we combine the ingredients. It’s a surprisingly straightforward process, and the melted cheese acts as a binder and provides an incredible, almost bread-like texture once baked.
1. First, we need to get our cheese base ready. In a microwave-safe bowl, combine the 3 cups of shredded mozzarella cheese and the 2 ounces of cream cheese. Microwave this mixture in 30-second intervals, stirring thoroughly after each interval, until both cheeses are completely melted and smooth. This usually takes about 1.5 to 2 minutes in total, depending on your microwave’s power. Be patient and stir well to ensure there are no lumps of cream cheese remaining. The goal is a uniformly smooth, gooey cheese mixture.
2. Once your cheese is perfectly melted and smooth, it’s time to incorporate the dry ingredients. Add the 1 3/4 cups of almond flour and 1 tablespoon of baking powder to the melted cheese mixture. Stir everything together until it’s well combined. At this stage, the mixture will be quite thick and a bit sticky, which is exactly what we want. The almond flour will absorb some of the moisture from the cheese, and the baking powder is essential for giving our buns a little lift and a tender crum extractb. Make sure to scrape down the sides of the bowl to get all the ingredients incorporated evenly.
3. Now, it’s time to add the eggs. Crack the 3 large eggs into the cheese and almond flour mixture. This is where the dough starts to come together more cohesively. Using a sturdy spoon or a spatula, mix the eggs into the dough until everything is thoroughly combined and forms a somewhat sticky, but manageable, dough. Don’t be alarmed if it’s a little gooey; this is normal. You might find it easier to use your hands towards the end to really knead the dough together and ensure all the ingredients are fully incorporated. The dough should feel pliable, not too wet, and not too dry.
Shaping and Baking
With our dough ready, we can move on to shaping and baking these delicious keto buns. This is the part where the transformation from a sticky dough to golden-brown buns happens!
4. Preheat your oven to 375 degrees Fahrenheit (190 degrees Celsius). Line a baking sheet with parchment paper. This is crucial to prevent the buns from sticking. Now, you’ll want to shape your buns. Since the dough is a bit sticky, I find it easiest to lightly dampen my hands with water or spray them with a non-stick cooking spray. Scoop out portions of the dough, about 1/4 cup each, and roll them into balls. Place the dough balls onto the prepared baking sheet, leaving about 2 inches of space between each bun to allow for expansion. You can gently flatten the tops of the buns with your palm or the bottom of a glass if you prefer a flatter bun, but I often like to leave them as rustic little rounds.
5. Bake the buns for 15-20 minutes, or until they are golden brown and firm to the touch. The exact baking time will depend on your oven and the size of your buns. Keep an eye on them towards the end of the baking time. You want a beautiful golden crust, but you don’t want them to burn. Once they’re done, remove them from the oven and let them cool on the baking sheet for a few minutes before transferring them to a wire rack to cool completely. Resist the urge to cut into them while they’re piping hot, as they will be easier to handle and slice once they’ve cooled down a bit. These buns are best enjoyed fresh, but leftovers can be stored in an airtight container at room temperature for a day or two, or in the refrigerator for longer storage. You can gently reheat them in a toaster oven or a regular oven for a few minutes to revive their delicious texture. Enjoy your homemade keto buns!

Conclusion:
I hope you’re as excited as I am about these easy keto buns! They truly are a game-changer for anyone following a low-carb lifestyle, offering that satisfying bun experience without the carb guilt. Their versatility is what really makes them shine – perfect for breakfast sandwiches, juicy burgers, or even as a delightful side for your favorite soups and stews. The simple ingredients and straightforward method mean you can whip up a batch whenever that craving strikes. Don’t be afraid to experiment with the variations I’ve suggested; adding herbs or a sprinkle of sesame seeds can elevate these already fantastic buns to a whole new level. I genuinely encourage you to give this recipe a try. You might just find your new go-to keto staple!
Frequently Asked Questions:
Q: How long do these keto buns last?
A: Stored in an airtight container at room temperature, these buns typically stay fresh for 2-3 days. For longer storage, I recommend keeping them in the refrigerator for up to a week, or freezing them for up to a month. Simply let them thaw at room temperature or gently warm them in a toaster oven or oven.
Q: Can I make these buns ahead of time?
A: Absolutely! They are perfect for meal prepping. You can bake them a day or two in advance and store them as mentioned above. They reheat beautifully, making your keto mornings and lunches much easier.
Q: What can I use if I don’t have almond flour?
A: While almond flour is ideal for texture and flavor, you can try substituting it with coconut flour, but you’ll need to significantly reduce the amount and potentially adjust the liquid ingredients, as coconut flour is very absorbent. You might need to experiment to get the right consistency.
Easy Keto Buns
Quick and simple keto buns made with cheese and almond flour. Perfect for a low-carb lifestyle.
Ingredients
-
3 cups shredded cheese (mozzarella cheese)
-
2 ounces cream cheese
-
1 3/4 cups almond flour
-
1 tablespoon baking powder
-
3 large eggs
Instructions
-
Step 1
Preheat your oven to 350°F (175°C). Line a baking sheet with parchment paper. -
Step 2
In a microwave-safe bowl, combine the shredded cheese and cream cheese. Microwave in 30-second intervals, stirring between each, until fully melted and combined. -
Step 3
Add the almond flour and baking powder to the cheese mixture. Stir until a dough forms. -
Step 4
Whisk the eggs in a separate bowl until lightly beaten. Add the eggs to the dough and mix until well incorporated and a uniform dough is achieved. -
Step 5
Divide the dough into 6-8 portions and shape them into small buns on the prepared baking sheet. -
Step 6
Bake for 15-20 minutes, or until golden brown and puffed up. -
Step 7
Let cool on the baking sheet for a few minutes before transferring to a wire rack to cool completely.
Important Information
Nutrition Facts (Per Serving)
It is important to consider this information as approximate and not to use it as definitive health advice.
Allergy Information
Please check ingredients for potential allergens and consult a health professional if in doubt.