Easy Lemon Truffles – Zesty-Creamy-Divine
Lemon truffles are a delightful little burst of sunshine, a truly magical treat that never fails to impress. I remember the first time I tasted one – it was like a little cloud of creamy, zesty happiness melting on my tongue. There’s something incredibly sophisticated yet wonderfully simple about these bite-sized delights. People adore them because they offer a perfect balance of sweet and tart, a refreshing counterpoint to richer desserts. What truly makes these lemon truffles special is their vibrant citrusy punch, a clean and invigorating flavor that dances on your palate. They’re not overly sweet, making them ideal for those who appreciate a more nuanced sweetness. Imagin extracte sharing these shimmering, delicate morsels with friends or family, or simply enjoying one with your afternoon tea. They are guaranteed to bring a smile to anyone’s face, and once you try making your own lemon truffles, you’ll understand just how easy it is to create such an elegant confection.
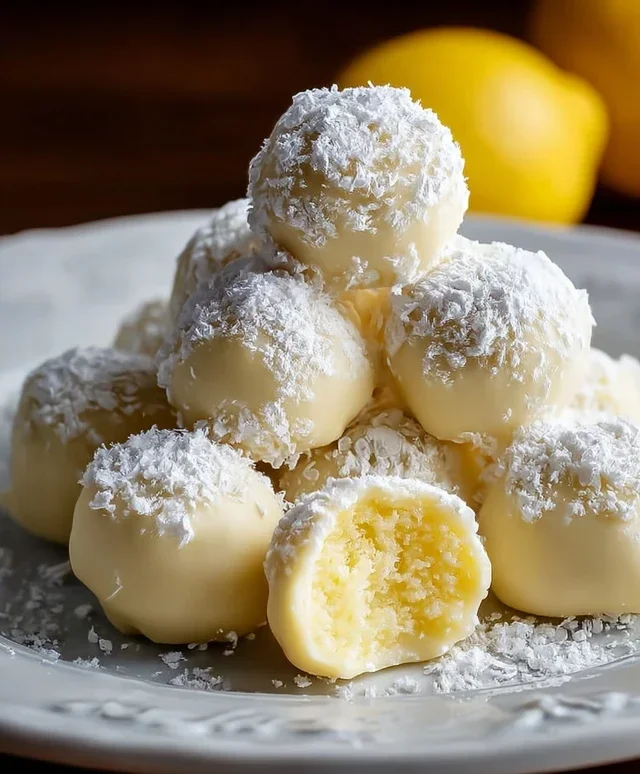
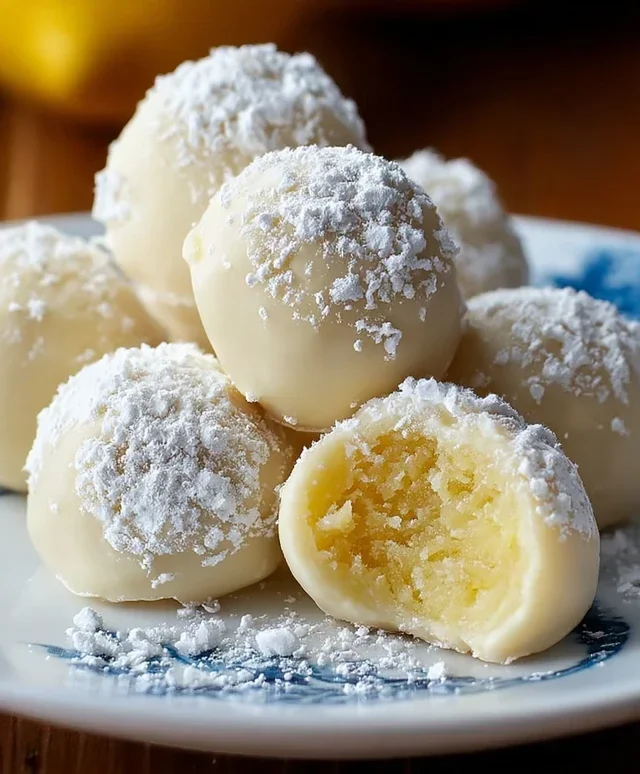
Lemon Truffles
Get ready to delight your taste buds with these incredibly easy and wonderfully tangy Lemon Truffles! They’re the perfect little bites of sunshine, bursting with bright lemon flavor and a creamy, decadent texture. Whether you’re looking for a sophisticated dessert for a special occasion or just a sweet treat to brighten your day, these truffles are sure to impress. What I love most about this recipe is how adaptable it is – you can easily make it dairy-free or even sugar-free depending on your preferences, and the process is so straightforward that even begin extractners can achieve truffle perfection. Let’s dive in and create some edible sunshine!
Ingredients:
The Creamy Lemon Base
The foundation of these delightful truffles is a rich and creamy mixture. We’ll start by ensuring our key ingredients are at the perfect consistency for easy mixing.
In a medium bowl, combine the softened cream cheese (or coconut butter) and the softened butter (or additional coconut butter). Using softened ingredients is crucial here; it allows them to blend smoothly without any lumps. If you’re using cream cheese, make sure it’s fully softened to room temperature. For coconut butter, it should be pliable but not melted into a liquid. You can achieve this by letting them sit on the counter for about an hour, or by gently warming them in a microwave for very short intervals, stirring in between, until they reach a spreadable consistency. Beat these two ingredients together with a whisk or an electric mixer on low speed until they are completely smooth and well incorporated. You’re aiming for a uniform, creamy texture, like thick frosting. This smooth base is what will give our truffles their luxurious mouthfeel.
Next, we’ll add the sweetness and the star of the show: the lemon zest. Sprinkle in the powdered sugar (or erythritol, if you’re opting for a sugar-free version) and the finely grated zest of one whole lemon. If you’re using powdered sugar, it will dissolve readily into the creamy base. If using erythritol, you might notice a slightly different texture, but it will still work wonderfully. The lemon zest is where all that vibrant, aromatic lemon flavor comes from. Be sure to zest only the yellow part of the lemon peel, avoiding the bitter white pith. A microplane zester is ideal for this, as it creates very fine zest particles that distribute the flavor evenly throughout the truffle mixture. Gently fold these ingredients into the cream cheese and butter mixture until just combined. Overmixing at this stage isn’t necessary and can sometimes make the mixture too soft.
Adding Extra Touches (Optional but Recommended!)
Now, we can elevate our truffles even further with a couple of optional but highly recommended additions.
-
4 oz cream cheese, softened
-
2 tbsp butter, softened
-
3 tbsp powdered sugar
-
Zest of one lemon
-
3 oz white chocolate chips
-
Optional drop of natural food coloring
-
Step 1
In a medium bowl, beat together the softened cream cheese and butter until smooth. -
Step 2
Gradually add the powdered sugar and lemon zest, mixing until well combined. -
Step 3
If using, stir in white chocolate chips and food coloring until evenly distributed. -
Step 4
Chill the mixture in the refrigerator for at least 30 minutes, or until firm enough to roll. -
Step 5
Roll the mixture into small balls, about 1-inch in diameter. -
Step 6
Place the truffles on a parchment-lined baking sheet and refrigerate for another 30 minutes to set.
If you’re looking for an extra layer of flavor and a smoother, more melt-in-your-mouth texture, this is where the white chocolate chips come in. For best results, gently melt the white chocolate chips. You can do this using a double boiler method or in the microwave. If using the microwave, place the chips in a microwave-safe bowl and heat on 50% power for 30-second intervals, stirring well after each interval, until they are almost completely melted. Stir until smooth. Once melted and smooth, fold the melted white chocolate into the lemon mixture. The white chocolate adds a touch of sweetness and a richer mouthfeel that complements the tangy lemon perfectly. If you prefer to keep these dairy-free, ensure you use a good quality dairy-free white chocolate.
At this point, you can also add a touch of color if you wish. A single drop of natural yellow food coloring can give your truffles a more pronounced lemon hue, making them visually appealing. Alternatively, a tiny pinch of turmeric powder will also impart a lovely yellow color and won’t affect the taste. Stir in your chosen coloring agent until the color is evenly distributed throughout the mixture. This step is purely for aesthetics but can make your truffles even more enticing, especially if you’re serving them to guests.
Forming and Chilling the Truffles
Once our flavorful base is ready, it’s time to shape these little gems.
Now comes the fun part – shaping! The mixture should be firm enough to handle. If it feels too soft to roll, don’t worry! Simply cover the bowl with plastic wrap and refrigerate for about 15-30 minutes, or until it’s firm enough to scoop and roll without sticking excessively to your hands. Once the mixture is firm, use a small spoon or a cookie scoop to portion out the truffle mixture. Roll each portion between your palms to form small, bite-sized balls, roughly about an inch in diameter. If the mixture becomes sticky, you can lightly dust your hands with a bit of powdered sugar or coconut flour, but be sparing as too much can alter the texture. Place the rolled truffles onto a baking sheet lined with parchment paper. Ensure they aren’t touching each other as they chill.
Once all your truffles are formed, place the baking sheet in the refrigerator and chill them for at least 30 minutes, or until they are firm to the touch. This chilling step is essential as it allows the truffles to set properly, making them easier to handle and ensuring they hold their shape. If you plan to coat them in anything (like more white chocolate, shredded coconut, or cocoa powder), this firm texture will be key for a clean coating. You can store the finished truffles in an airtight container in the refrigerator for up to a week. They are best enjoyed chilled, offering a delightful pop of cool, lemony flavor. Enjoy your homemade Lemon Truffles!
Conclusion:
I hope you’ve enjoyed learning how to create these delightful Lemon Truffles! They truly are a fantastic treat, offering a perfect balance of rich, creamy chocolate and bright, zesty lemon that will tantalize your taste buds. The simplicity of the recipe, combined with the impressive presentation, makes them an ideal choice for both casual indulgence and special occasions. Whether you’re looking for a quick dessert, a thoughtful homemade gift, or just a little pick-me-up, these lemon truffles are sure to hit the spot.
These versatile little gems are wonderful served on their own, perhaps alongside a cup of coffee or tea. For a more elegant presentation, arrange them on a decorative platter. They also make a beautiful addition to a dessert buffet or as a sweet ending to a dinner party. Don’t be afraid to experiment with variations! You could add a hint of lavender to the chocolate for a floral twist, or even dip them partially in white chocolate for a stunning visual contrast. I truly encourage you to give this recipe a try – you won’t be disappointed!
Frequently Asked Questions:
Q: How should I store my Lemon Truffles?
You can store your lemon truffles in an airtight container in the refrigerator for up to two weeks. For the best flavor and texture, let them sit at room temperature for about 15-20 minutes before serving.
Q: Can I make these Lemon Truffles dairy-free?
Absolutely! To make them dairy-free, simply use dairy-free white chocolate chips and a dairy-free cream alternative (like coconut cream or oat cream) for the ganache. Ensure your white chocolate also doesn’t contain any hidden dairy ingredients.
Q: My truffle coating isn’t smooth. What went wrong?
The smoothness of the coating often depends on the temperature of the chocolate. If your chocolate is too hot, it can melt the ganache too quickly, leading to a less smooth finish. Try letting the melted chocolate cool slightly before dipping your chilled truffles. Also, ensure your ganache is well chilled before rolling into balls.
Lemon Truffles
Delightful no-bake lemon truffles with a creamy citrus flavor, perfect for a sweet treat.
Ingredients
Instructions
Important Information
Nutrition Facts (Per Serving)
It is important to consider this information as approximate and not to use it as definitive health advice.
Allergy Information
Please check ingredients for potential allergens and consult a health professional if in doubt.