Perfect Grilled Pizza Recipe- Easy Steps
How to Make the Perfect Grilled Pizza is not just a recipe; it’s an experience. Imagin extracte a warm summer evening, the scent of smoky char mingling with fresh basil, and the satisfaction of pulling a perfectly blistered, slightly chewy pizza crust right off the grill. That’s the magic we’re chasing today! Forget soggy bottoms and unevenly cooked toppings; grilled pizza offers a textural symphony that oven-baked versions can only dream of. The intense heat of the grill sears the dough, creating those irresistible crispy edges while keeping the inside wonderfully tender. It’s a simple yet incredibly rewarding way to elevate your pizza game and impress your friends and family. This is how we’re going to achieve that unforgettable grilled pizza perfection, step by delicious step.

How to Make the Perfect Grilled Pizza
There’s something undeniably special about pizza. But taking your pizza game to the next level by grilling it? That’s a whole new ballgame. The intense heat of the grill imparts a smoky flavor and a delightfully crisp crust that simply can’t be replicated in a conventional oven. It’s a fantastic way to entertain, especially in warmer months, and surprisingly easier than you might think. Forget soggy bottoms and unevenly cooked toppings; we’re going to achieve pizza perfection on the grill.
Ingredients:
Preparing Your Dough and Toppings
The foundation of any great pizza is the dough. If you’re using store-bought, let it come to room temperature for about 30-60 minutes before you plan to grill. This makes it much easier to stretch and handle. If you’re making your own, ensure it’s been properly proofed.
While your dough is resting, get all your toppings ready. Slice your vegetables thinly so they cook through quickly on the grill. If you’re using meat toppings like beef pepperoni or cooked sausage, have them ready to go. Grating your Parmesan cheese and tearing or slicing your mozzarella in advance will save you time when assembling your pizzas on the hot grill.
Grilling the Pizza
This is where the magic happens. Grilling pizza requires a bit of preparation and attention, but the results are incredibly rewarding.
Step 1: Preheat Your Grill
This is perhaps the most crucial step for achieving a perfectly cooked grilled pizza. You want your grill to be hot – really hot. Aim for a medium-high heat, around 450-500 degrees Fahrenheit. If you have a gas grill, turn all the burners on high and let it preheat for at least 10-15 minutes. If you’re using a charcoal grill, arrange your coals for direct heat and wait until they are covered in a fine layer of ash. A hot grill ensures that the crust gets a good sear quickly, preventing it from becoming tough or overcooked.
Step 2: Prepare Your Pizza Dough for Grilling
Lightly dust a clean surface with cornmeal or semolina flour. This will prevent the dough from sticking and help give the bottom of your pizza a nice texture. Gently stretch your pizza dough into your desired shape and thickness. I like to aim for about a 12-inch circle or rectangle. Don’t overwork the dough, and don’t worry if it’s not perfectly round; rustic is beautiful when it comes to grilled pizza. Once stretched, lightly brush one side of the dough with olive oil. This oiled side will be the one that hits the grill first.
Step 3: Grill the First Side of the Dough
Carefully transfer the dough, oiled side down, directly onto the preheated grill grates. Close the lid and let it cook for about 2-4 minutes. You’re looking for the dough to puff up and develop some nice char marks. Keep a close eye on it; the grill is a dynamic cooking surface, and flare-ups can happen. You’ll know it’s ready to flip when you can easily slide a spatula underneath it without it sticking.
Step 4: Flip and Top Your Pizza
Using a sturdy spatula, carefully flip the pizza dough over. Now that the grilled side is facing up, quickly spread your pizza sauce evenly over the cooked side, leaving a small border for the crust. Then, scatter your mozzarella cheese over the sauce, followed by your chosen toppings. Finally, sprinkle the grated Parmesan cheese over everything. Work quickly here, as the second side of the dough is still cooking, and you don’t want the toppings to sit on a cold surface for too long.
Step 5: Grill the Second Side and Melt the Cheese
Once your pizza is topped, close the grill lid again. Reduce the heat slightly if necessary, to medium heat, to prevent the bottom from burning before the cheese has a chance to melt. Grill for another 5-8 minutes, or until the crust is golden brown and crispy, and the cheese is melted and bubbly. You can lift the edge of the pizza with your spatula to check the bottom for doneness.
Step 6: Rest and Serve
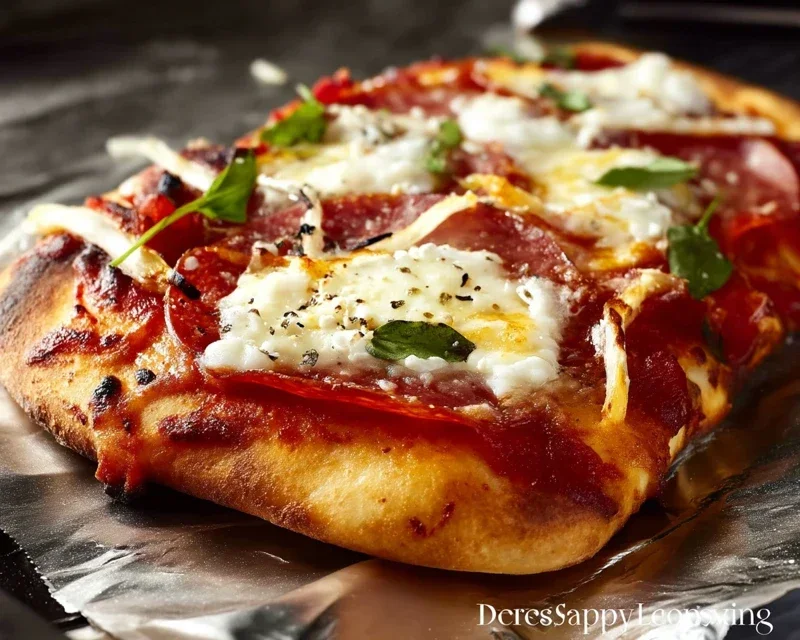
Once your grilled pizza is cooked to perfection, carefully remove it from the grill using a spatula and transfer it to a cutting board. Let it rest for a minute or two. This brief resting period allows the cheese to set slightly, making it easier to slice. Garnish with fresh basil leaves, if desired, and season with salt and freshly ground black pepper to taste. Slice and enjoy your incredible homemade grilled pizza immediately! The smoky char, the perfectly cooked crust, and the gooey cheese make this a truly unforgettable pizza experience.
Conclusion:
You’ve now learned the secrets to crafting the absolute perfect grilled pizza! This method delivers a delightfully crisp, slightly smoky crust that store-bought or oven-baked pizzas simply can’t replicate. The beauty of grilled pizza lies in its simplicity and incredible versatility. Imagin extracte a warm summer evening, the sizzle of the grill, and the aroma of fresh dough mingling with your favorite toppings. It’s truly a rewarding culinary experience that brings people together.
Serve your masterpiece hot off the grill with a fresh side salad or some grilled vegetables for a complete and satisfying meal. For variations, don’t be afraid to get creative! Try a white pizza with ricotta, garlic, and spinach, or a spicy beef chorizo and pepper concoction. You can even experiment with different dough recipes. I highly encourage you to gather your friends and family and give this perfect grilled pizza a try. You won’t be disappointed!
Frequently Asked Questions:
Can I make the dough ahead of time?
Absolutely! Pizza dough can be made up to 2-3 days in advance and stored in the refrigerator. Just be sure to let it come to room temperature for about 30-60 minutes before you plan to grill it for easier handling.
What if I don’t have a grill brush? How do I clean the grates?
If you don’t have a grill brush, you can often use a balled-up piece of heavy-duty aluminum foil held with tongs to scrape the grates clean. Alternatively, you can lightly oil a wad of paper towels (using tongs to hold them) and rub them over the hot grates to remove debris.
My pizza is sticking to the grill. What am I doing wrong?
This is a common issue! Ensure your grill grates are very clean and well-oiled before placing the dough on them. Also, make sure your grill is adequately preheated. Once the dough has had a few minutes to crisp up on the first side, it will release more easily. Resist the urge to move it too soon!
Perfect Grilled Pizza
Learn to craft a delicious pizza on the grill, perfect for outdoor gatherings.
Ingredients
-
Pizza dough
-
Olive oil
-
Tomato sauce
-
Shredded mozzarella cheese
-
Toppings of your choice (e.g., sliced bell peppers, onions, mushrooms)
-
Ground beef
-
Pork sausage
Instructions
-
Step 1
Preheat your grill to medium-high heat. Lightly oil the grill grates. -
Step 2
Stretch or roll out your pizza dough to your desired thickness. Brush one side with olive oil. -
Step 3
Carefully place the dough, oiled-side down, onto the preheated grill. Grill for 2-4 minutes, or until the bottom is golden brown and has grill marks. -
Step 4
Flip the dough over. Spread with tomato sauce, then layer with cheese and your desired toppings. If using raw meats like ground beef and pork sausage, ensure they are pre-cooked before adding to the pizza. -
Step 5
Close the grill lid and cook for another 5-8 minutes, or until the cheese is melted and bubbly and the crust is cooked through. -
Step 6
Remove the pizza from the grill and let it rest for a minute before slicing and serving.
Important Information
Nutrition Facts (Per Serving)
It is important to consider this information as approximate and not to use it as definitive health advice.
Allergy Information
Please check ingredients for potential allergens and consult a health professional if in doubt.