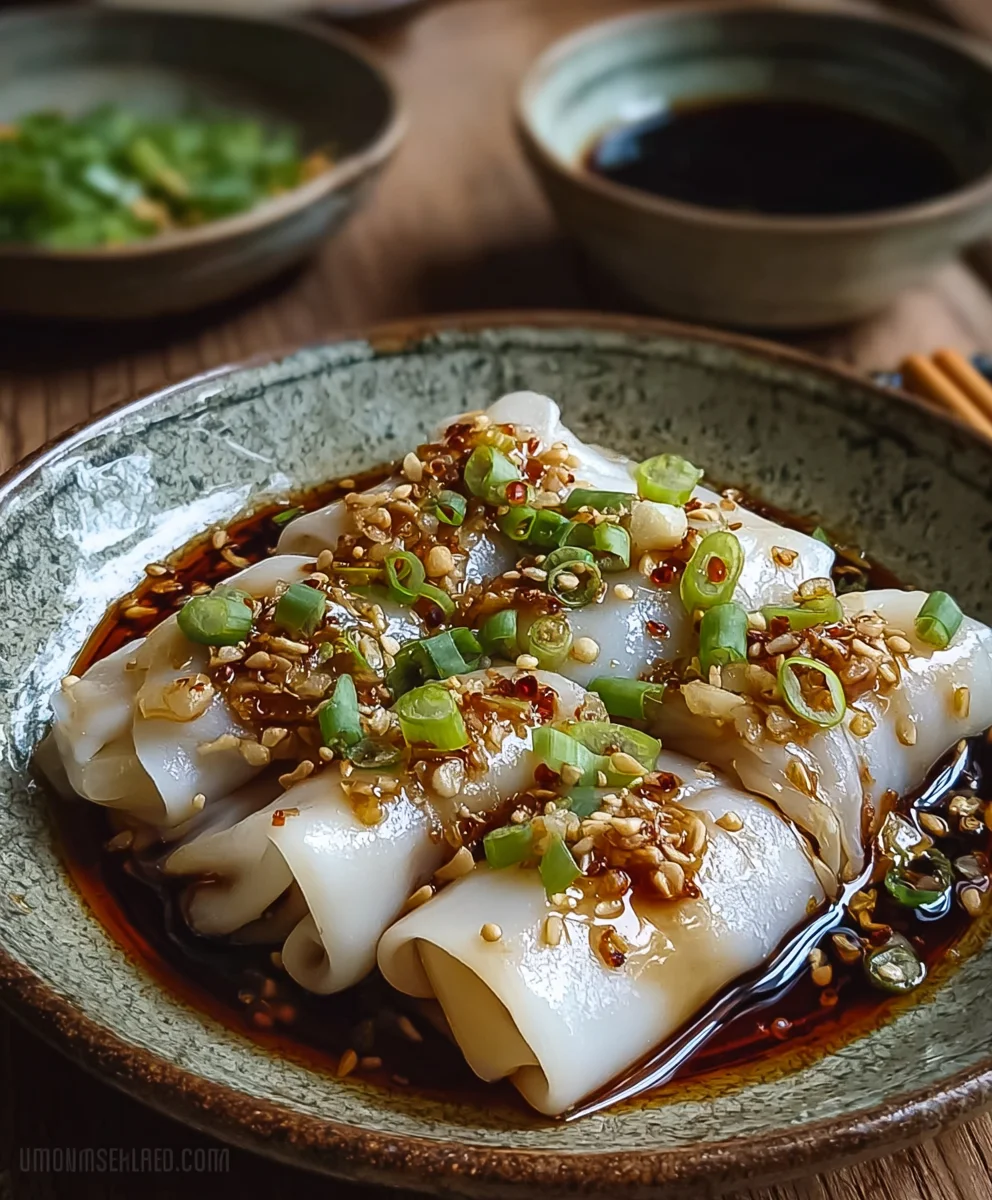
Cheung Fun – Delicious Steamed Rice Noodle Rolls
Cheung Fun, those wonderfully silky and tender steamed rice noodle rolls, are a beloved staple of dim sum and street food stalls across Hong Kong and beyond. What is it about these seemingly simple rolls that captures our hearts and taste buds? It’s the glorious textural contrast: the impossibly smooth, almost melt-in-your-mouth rice sheets, often paired with savory fillings like succulent shrimp, tender beef, or flavorful char siu. The magic of Cheung Fun lies not just in its delicate chew, but in the satisfying slurp as you pull a piece apart, glistening with a savory sauce that perfectly complements its mild rice flavor. It’s a comforting, deeply satisfying dish that evokes a sense of nostalgia for many, a culinary hug that’s perfect for a weekend brunch or a quick, delicious snack.
The Secret to Perfect Cheung Fun
Making authentic Cheung Fun at home might seem daunting, but with a few key techniques and a little practice, you can achieve that signature ethereal texture. Forget the pre-packaged versions; the joy of this dish is in its freshness and the ability to customize your fillings. We’ll dive into the essential ingredients and the steaming method that will elevate your homemade Cheung Fun from good to absolutely unforgettable. Get ready to impress yourself and your loved ones with this quintessential Cantonese delight.
Ingredients:
- 1 cup rice flour (for the batter).
- ⅓ cup tapioca starch (for the batter).
- 3 cups water (for the batter).
- 1 tsp cooking oil (for the batter).
- Pinch of salt (for the batter).
- Cooked shrimp, diced (optional filling).
- Minced beef or beef, cooked (optional filling).
- Fried shallots (to garnish).
- 3 tbsp soy sauce (for dipping sauce).
- 1 tbsp water (for dipping sauce).
- 1 tsp sugar (for dipping sauce).
- 1 tsp sesame oil (for dipping sauce).
Making the Cheung Fun Batter
The foundation of perfect Cheung Fun lies in a silky smooth batter. In a medium-sized bowl, combine the rice flour and tapioca starch. These two flours work in harmony to create the characteristic tender yet slightly chewy texture. Rice flour provides the bulk and structure, while tapioca starch contributes to the translucency and that delightful elasticity. Whisk these dry ingredients together thoroughly to ensure there are no lumps and the starches are evenly distributed.
Next, gradually add the 3 cups of water while continuously whisking. It’s important to add the water slowly, especially at the begin extractning, to prevent the dry flours from clumping. Aim for a consistency that is thin and milky, much like heavy cream. Once all the water is incorporated and the mixture is smooth, stir in the 1 teaspoon of cooking oil. This oil is crucial as it helps prevent the Cheung Fun from sticking to your steaming trays, ensuring a clean release every time. Finally, add a pinch of salt to enhance the overall flavor of the steamed rice noodle rolls. Give the batter one last good whisk to make sure everything is perfectly combined. For an even smoother batter, you can strain it through a fine-mesh sieve to remove any tiny lumps that might have escaped your whisking. Let the batter rest for at least 15-30 minutes at room temperature; this allows the starches to fully hydrate and will contribute to a better texture.
Preparing the Dipping Sauce
While the batter rests, it’s the perfect time to whip up the flavorful dipping sauce. This sauce is simple but essential to the Cheung Fun experience. In a small saucepan, combine the 3 tablespoons of soy sauce, 1 tablespoon of water, and 1 teaspoon of sugar. Stir these ingredients together until the sugar is completely dissolved. Place the saucepan over low heat and gently warm the mixture. You don’t want to boil it, just warm it through to help the flavors meld. Once warmed, remove it from the heat and stir in the 1 teaspoon of sesame oil. The sesame oil adds a wonderful nutty aroma and depth of flavor. Taste the sauce and adjust the sweetness or saltiness to your preference. You can add a tiny bit more sugar for sweetness or a splash more soy sauce for saltiness. Set this aside, as it’s best served at room temperature.
Steaming the Cheung Fun
Now comes the exciting part: steaming the Cheung Fun! You’ll need a flat, rimmed metal tray (about 8×8 inches or similar is a good starting point). Lightly grease the tray with a bit of cooking oil, or you can use a piece of parchment paper lightly oiled to ensure easy removal. Bring your steamer to a rolling boil. This is a critical step; a consistently hot steamer is key to achieving the correct texture.
Once the steamer is ready, give your batter a quick stir. Ladle about ¼ to ⅓ cup of the batter onto the prepared tray, tilting the tray to spread the batter into a thin, even layer. Don’t make it too thick, or the Cheung Fun will be gummy. If you’re adding fillings like cooked shrimp or minced beef, sprinkle them evenly over the thin layer of batter at this stage. Work quickly but carefully.
Carefully place the tray into the steaming basket of your pot. Cover the steamer tightly and steam for about 3-5 minutes, or until the batter is no longer liquid and appears translucent and slightly puffed. The cooking time will depend on the thickness of your batter layer and the heat of your steamer. You’re looking for the characteristic shiny, slightly gelatinous appearance.
Rolling the Cheung Fun
Once a batch is steamed and ready, carefully remove the tray from the steamer. This requires caution as it will be hot and steamy. Let it sit for about 30 seconds to a minute to allow it to set slightly, making it easier to handle. Gently run an offset spatula or a bench scraper around the edges of the steamed rice noodle sheet to loosen it from the tray. Starting from one edge, carefully fold or roll the sheet into a log. Some people prefer to fold it in half, then in half again, while others prefer to roll it up more tightly. The goal is to create a neat, contained roll. Once rolled, carefully slide it off the tray and onto a plate.
Repeat this entire steaming and rolling process with the remaining batter and any desired fillings. It’s best to have everything prepared and ready to go before you start steaming, as the process is relatively quick. As you finish each roll, you can place it next to the previous one on the plate.
Serving and Garnishing
To serve your delicious homemade Cheung Fun, arrange the rolled noodle sheets on a serving platter. Drizzle them generously with the prepared dipping sauce. For an extra touch of flavor and texture, sprinkle a good amount of fried shallots over the top. The crispy, savory shallots provide a wonderful contrast to the soft, tender rice noodle rolls. You can also serve some extra dipping sauce on the side for those who like to add more. Enjoy your authentic Cheung Fun immediately while it’s warm and fresh!

Conclusion:
There you have it! You’ve learned how to create delicious homemade Cheung Fun, a delightful and surprisingly accessible dim sum classic. We’ve covered the essential steps, from preparing the rice noodle batter to the steaming and saucing, ensuring you can replicate this beloved dish in your own kitchen. The beauty of Cheung Fun lies in its simplicity and versatility. Don’t be afraid to experiment with different fillings like shrimp, barbecued beef, or even simple seasoned mushrooms. Serve these fresh, tender rice noodle rolls immediately for the best texture. They make a fantastic breakfast, brunch, or light meal. The slightly chewy noodles, paired with the savory sauce, create a truly satisfying experience.
I encourage you to give this recipe a try. With a little practice, you’ll be a Cheung Fun master in no time! Enjoy the process and the incredibly rewarding taste of freshly made rice noodle rolls.
Frequently Asked Questions about Cheung Fun:
Q1: What is the best way to get the Cheung Fun noodles thin and even?
Achieving thin and even noodles is key to great Cheung Fun. Ensure your batter is smooth and free of lumps by straining it if necessary. When spreading the batter on the steaming tray, use a light touch and spread it thinly and evenly. A flexible spatula or a bench scraper can be helpful for this. Don’t overcrowd the tray with too much batter, as this will result in thicker noodles.
Q2: Can I make the Cheung Fun batter ahead of time?
Yes, you can absolutely make the Cheung Fun batter ahead of time. Once the batter is prepared and smooth, cover it tightly and refrigerate it for up to 24 hours. You may need to whisk it again before using, as the rice flour can settle. This makes the preparation process even more convenient, especially if you plan to serve Cheung Fun for a weekend brunch.
Cheung Fun – Delicious Steamed Rice Noodle Rolls
Soft, slippery, and slightly chewy steamed rice noodle rolls, perfect with a savory dipping sauce and crispy fried shallots. A classic dim sum favorite that’s surprisingly easy to make at home.
Ingredients
-
1 cup rice flour (for the batter)
-
⅓ cup tapioca starch (for the batter)
-
3 cups water (for the batter)
-
1 tsp cooking oil (for the batter)
-
Pinch of salt (for the batter)
-
Cooked shrimp, diced (optional filling)
-
Cooked minced beef (optional filling)
-
Fried shallots (to garnish)
-
3 tbsp soy sauce (for dipping sauce)
-
1 tbsp water (for dipping sauce)
-
1 tsp sugar (for dipping sauce)
-
1 tsp sesame oil (for dipping sauce)
Instructions
-
Step 1
To make the batter, combine rice flour and tapioca starch in a bowl. Whisk dry ingredients. Gradually add water while whisking until smooth and thin, like heavy cream. Stir in cooking oil and a pinch of salt. Strain for a smoother batter and let rest for 15-30 minutes. -
Step 2
Prepare the dipping sauce by combining soy sauce, water, and sugar in a small saucepan. Gently warm over low heat until sugar dissolves. Remove from heat and stir in sesame oil. Set aside. -
Step 3
Lightly grease a flat, rimmed metal tray. Bring steamer to a rolling boil. Stir the batter. Ladle about ¼ to ⅓ cup of batter onto the tray, tilting to spread thinly. Add optional fillings like shrimp or beef if desired. -
Step 4
Carefully place the tray into the hot steamer. Cover tightly and steam for 3-5 minutes, or until the batter is translucent and slightly puffed. Remove tray from steamer. -
Step 5
Let the steamed sheet sit for about 30 seconds. Loosen edges with a spatula. Fold or roll the sheet into a log. Carefully slide the roll onto a plate. -
Step 6
Repeat steaming and rolling for remaining batter and fillings. Arrange rolls on a platter, drizzle with dipping sauce, and sprinkle with fried shallots before serving.
Important Information
Nutrition Facts (Per Serving)
It is important to consider this information as approximate and not to use it as definitive health advice.
Allergy Information
Please check ingredients for potential allergens and consult a health professional if in doubt.