Easy Homemade Bread Recipe – Perfect Loaf
Homemade bread isn’t just a recipe; it’s an experience. There’s an undeniable magic that happens when you transform simple ingredients—flour, water, yeast, and salt—into a warm, crusty loaf that fills your kitchen with an aroma second to none. We all have those memories tied to the smell of baking bread, a comforting embrace that whispers of home and tradition. But beyond nostalgia, what makes this so special? It’s the unparalleled satisfaction of creating something so fundamental with your own two hands, the ability to customize its flavor and texture to your exact liking, and the sheer joy of sharing a truly delicious, wholesome creation. Forget the supermarket aisles; this is your invitation to a world of superior flavor and artisanal pride. Get ready to master the art of homemade bread and discover the profound pleasure it brings.
Why You’ll Love Making This Bread
The unparalleled aroma and taste of fresh, homemade bread is simply unmatched.
Beyond the sensory delight, there’s a deep sense of accomplishment in baking your own loaf. You control the ingredients, ensuring a wholesome, preservative-free product. This recipe is designed to be accessible, even for begin extractner bakers, demystifying the process and empowering you to achieve fantastic results. Imagin extracte the pride you’ll feel serving a loaf you baked from scratch!
The Joy of Homemade Bread
There’s something incredibly satisfying about pulling a warm, crusty loaf of homemade bread from your oven. The aroma alone can transform a kitchen into a haven. Forget the pre-packaged stuff; baking your own bread is not only surprisingly simple but also incredibly rewarding. It’s a process that connects you to a timeless tradition and offers a tangible, delicious result. This recipe will guide you through creating a basic, versatile loaf that’s perfect for slicing, toasting, or simply tearing apart and enjoying.
Ingredients:
*Note on Flour: While all-purpose flour works beautifully, bread flour has a higher protein content, which develops more gluten, resulting in a chewier texture and a better rise. You can experiment with both to see which you prefer.
Getting Started: Activating the Yeast
The first crucial step in any bread recipe is to ensure your yeast is alive and ready to work its magic. This is called “blooming” or “proofing” the yeast.
Building the Dough
Once your yeast is happily frothing, it’s time to incorporate the other ingredients and begin extract forming the dough.
- To the activated yeast mixture, add the 2 teaspoons of salt and the 2 Tablespoons of oil. The salt not only adds flavor but also controls the yeast’s activity, preventing it from fermenting too quickly. The oil contributes to a softer crum extractb. Now, it’s time to add your flour. Start by adding 4 cups of flour to the bowl. Using a sturdy spoon or a dough whisk, begin extract to mix everything together. The mixture will be shaggy and wet at this stage. Gradually add more flour, about 1/4 cup at a time, until the dough starts to pull away from the sides of the bowl and forms a cohesive ball. You might not need all 5 1/2 cups, or you might need a little more – it depends on the humidity and the type of flour you’re using. The dough should be slightly sticky but manageable.
- Turn the dough out onto a lightly floured surface. If the dough is very sticky, add just a little bit more flour to your hands and the surface. Begin extract kneading by pushing the dough away from you with the heels of your hands, then folding it back over on itself. Rotate the dough a quarter turn and repeat. Continue this process for about 8 to 10 minutes. You’re looking for the dough to become smooth, elastic, and no longer sticky to the touch. You can perform the “windowpane test” to check for proper gluten development: gently stretch a small piece of the dough. If you can stretch it thinly enough to see light through it without it tearing, your gluten is well-developed.
- Lightly grease a clean bowl with a little oil. Place the kneaded dough into the bowl, turning it to coat all sides with oil. Cover the bowl tightly with plastic wrap or a clean kitchen towel. Place the bowl in a warm, draft-free spot to rise for about 1 to 1 1/2 hours, or until the dough has doubled in size. A slightly warm oven (turned off, but preheated to its lowest setting for a minute and then turned off) can be an ideal spot. This first rise is often called the “bulk fermentation.”
- Once the dough has doubled in size, gently punch it down to release the air. Turn the dough out onto a lightly floured surface again. Shape the dough into your desired loaf shape – a classic round boule, a long baguette, or a simple rectangular loaf for a loaf pan. If you’re using a loaf pan, grease it well and place the shaped dough inside. If you’re making a free-form loaf, you can place it on a baking sheet lined with parchment paper. Cover the shaped dough loosely with plastic wrap or a kitchen towel and let it rise again for another 30 to 45 minutes, or until it has nearly doubled in size. This second rise is crucial for a light and airy final product.
- Preheat your oven to 375 degrees Fahrenheit (190 degrees Celsius). If you like a crispier crust, you can place a shallow pan of water on the bottom rack of the oven while it preheats. This creates steam, which helps achieve that desirable crust. Once the oven is preheated and the dough has completed its second rise, you can optionally score the top of the loaf with a sharp knife or a lame. This helps control the expansion of the bread as it bakes. Carefully place the loaf into the preheated oven. Bake for 30 to 40 minutes, or until the crust is deep golden brown and the loaf sounds hollow when tapped on the bottom. If the crust is browning too quickly, you can loosely tent it with aluminum foil.
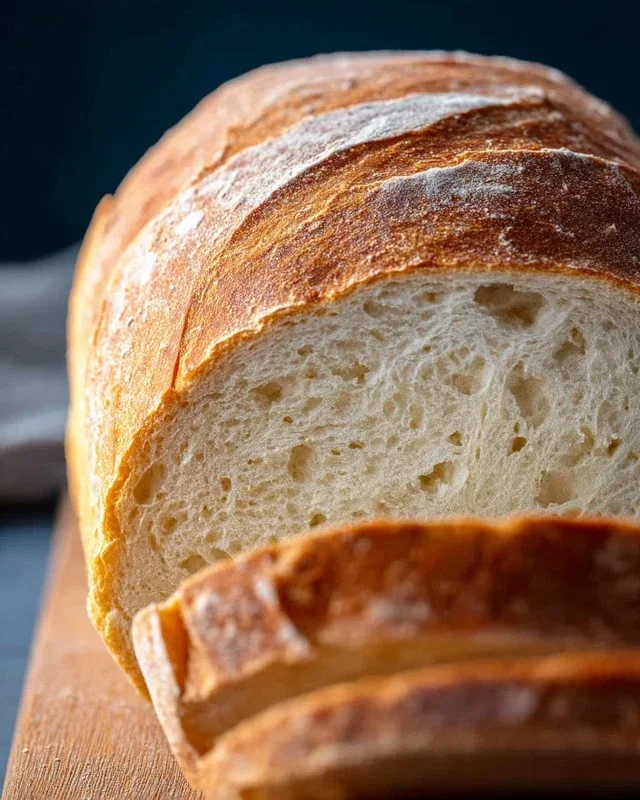
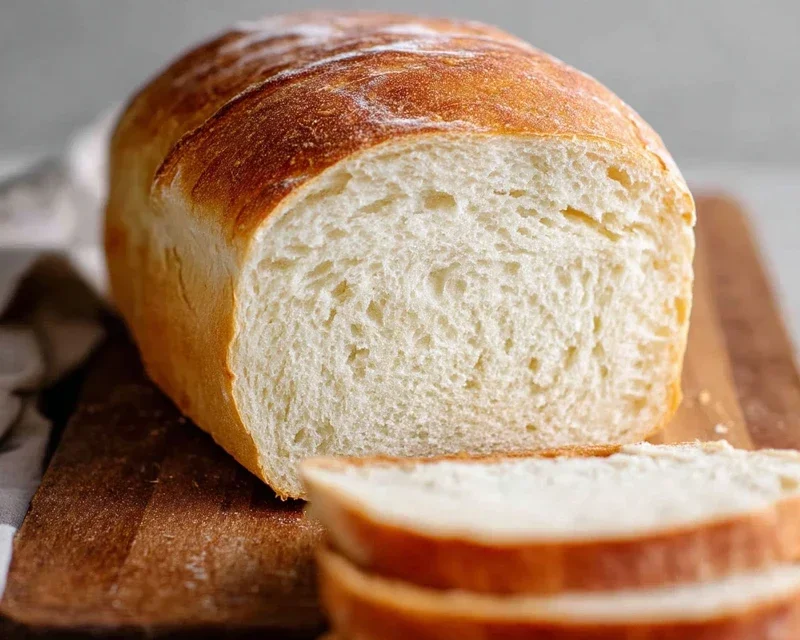
- Once baked, immediately remove the bread from the oven and transfer it to a wire rack to cool completely. This is important because the bread continues to cook as it cools, and if you slice it too soon, the inside might be gummy. Resist the urge to cut into it right away – the wait is worth it for the best texture and flavor. Once cooled, slice and enjoy your magnificent homemade bread!
-
2 cups warm water (105-115 degrees F)
-
1 Tablespoons active dry yeast
-
1/4 cup honey
-
2 teaspoons salt
-
2 Tablespoons canola oil
-
4 1/2 cups all-purpose flour
-
Step 1
In a large bowl, combine warm water and honey. Sprinkle yeast over the top and let it sit for 5-10 minutes until foamy. -
Step 2
Stir in the salt and oil until well combined. -
Step 3
Gradually add the flour, one cup at a time, mixing until a shaggy dough forms. Knead on a lightly floured surface for 8-10 minutes until smooth and elastic. -
Step 4
Place the dough in a lightly oiled bowl, cover with plastic wrap, and let it rise in a warm place for about 1 hour, or until doubled in size. -
Step 5
Punch down the dough and shape it into a loaf. Place it in a greased loaf pan. -
Step 6
Bake in a preheated oven at 375 degrees F (190 degrees C) for 30-35 minutes, or until golden brown and the internal temperature reaches 200 degrees F (93 degrees C). -
Step 7
Remove from the pan and let it cool on a wire rack before slicing.
Kneading: Developing the Gluten
Kneading is perhaps the most hands-on part of bread making, and it’s where you develop the gluten structure that gives bread its chewy texture and allows it to rise.
First Rise: Letting the Dough Work
This is where the magic of the yeast really comes into play, as it ferments and produces gases that cause the dough to rise.
Shaping and Second Rise
After the dough has risen, it needs to be shaped and allowed to rise a second time before baking.
Baking to Perfection
The final stage is baking, where the dough transforms into a beautiful, golden-brown loaf.
Cooling and Enjoying
The hardest part is waiting for the bread to cool!
Baking your own bread is an experience that engages all your senses. From the tactile pleasure of kneading to the non-intoxicating aroma of baking, and finally, the incredible taste of a warm, fresh slice – it’s a journey of culinary delight. Don’t be intimidated; embrace the process, and you’ll be rewarded with a delicious and satisfying accomplishment.
Conclusion:
And there you have it – your very own delicious loaf of homemade bread! This recipe truly shines because it’s surprisingly simple, yielding a beautiful, crusty exterior and a soft, airy interior that store-bought loaves simply can’t compete with. The aroma that fills your kitchen as it bakes is unparalleled, and the satisfaction of pulling a golden-brown loaf from the oven is incredibly rewarding. Don’t be intimidated; even if it’s your first time, you’ll be amazed at what you can achieve.
This versatile homemade bread is perfect for so many things! Enjoy it warm with a generous slather of butter or your favorite jam for breakfast. It makes fantastic toast, is the ultimate base for sandwiches, and is ideal for dipping into hearty soups and stews. For a touch of elegance, consider brushing the crust with a little olive oil and herbs before serving. Feel free to experiment with variations too! Add seeds like sunflower or poppy to the dough, or incorporate a handful of chopped herbs like rosemary or thyme for extra flavor. You could even try a touch of sweetness with a tablespoon of honey or maple syrup.
I truly encourage you to give this recipe a try. The process is therapeutic, and the end result is a tangible reward that will bring smiles to your table. Embrace the joy of baking your own homemade bread – you won’t regret it!
Frequently Asked Questions:
Why is my bread dense instead of airy?
A common reason for dense bread is insufficient gluten development or over-proofing. Ensure you are kneading the dough thoroughly to build strong gluten strands, which trap the gases produced by the yeast. Also, make sure the dough has risen sufficiently in a warm place before baking. Over-handling the dough after its initial rise can also deflate it.
Can I use a different type of flour?
Yes, you can! While this recipe is designed for all-purpose flour, you can experiment with other flours. Whole wheat flour will result in a denser, nuttier loaf, and you might need to adjust the liquid slightly. For sourdough, a different starter and process are required. Remember that different flours have varying gluten content and absorption rates, so some experimentation might be needed for optimal results.
Homemade Bread
A simple and delicious recipe for soft, homemade bread from scratch, perfect for any meal.
Ingredients
Instructions
Important Information
Nutrition Facts (Per Serving)
It is important to consider this information as approximate and not to use it as definitive health advice.
Allergy Information
Please check ingredients for potential allergens and consult a health professional if in doubt.